


DIY Furniture Makeover: How to Apply Peel and Stick Tiles
Replacing outdated furniture is incredibly expensive, and sanding down an old dresser often feels like a messy weekend trap. If you are tired of living with bland cabinets or scuffed tabletops, you might assume a costly replacement is your only option. You are not alone in this frustration. Millions of perfectly functional pieces of furniture are discarded every year simply because their surface aesthetics have faded, leading to unnecessary financial strain and environmental waste.
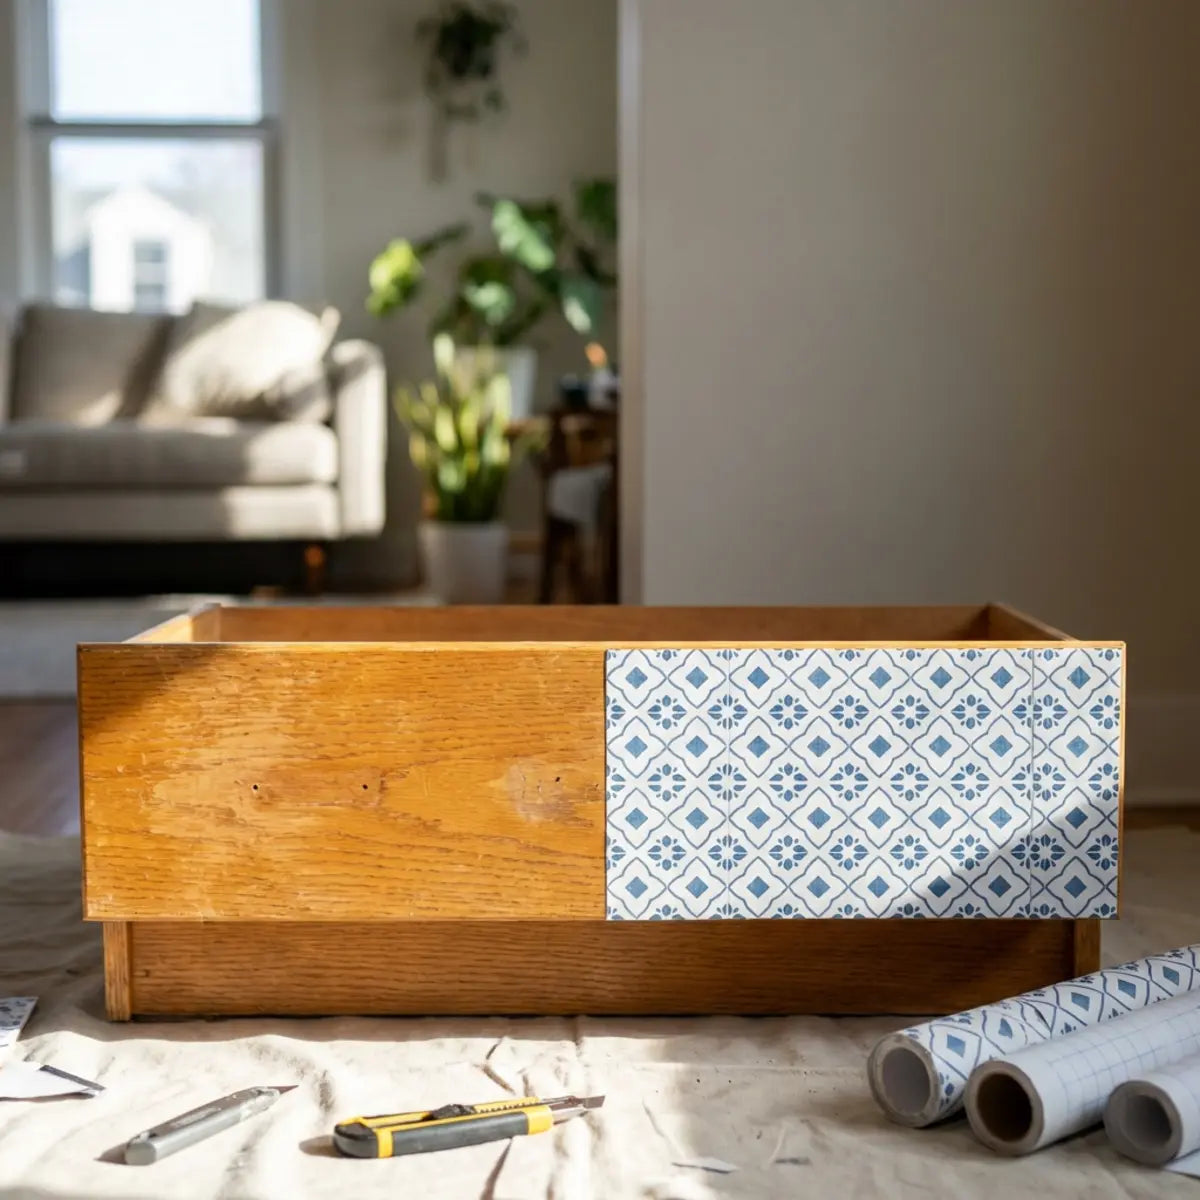
Applying peel and stick tiles to furniture is a simple, renter-friendly way to upgrade cabinets or dressers with style and texture. You can achieve a professional look using self-adhesive tiles that adhere to most smooth surfaces, and they are removable without damage. This modern approach to upcycling bypasses the fumes of paint, the dust of heavy sanding, and the permanence of traditional hardware installation.
This affordable transformation allows you to customize pieces without permanent commitment. Whether you want to revitalize a thrifted find or add character to generic flat-pack furniture, self-adhesive tiles provide an accessible entry point into home design. It empowers you to become the architect of your own space, utilizing tactile textures and vibrant patterns to breathe entirely new life into your existing household inventory.
What makes peel and stick tiles a good choice for furniture makeovers?
Peel and stick tiles offer an optimal balance of cost-efficiency, visual impact, and renter-friendly reversibility for furniture makeovers. They fundamentally neutralize the risk associated with permanent alterations, providing a high-impact aesthetic change that you can remove whenever your lease ends or your tastes shift. Unlike traditional remodeling materials that require grout, specialized saws, and days of curing time, these modern adhesive solutions allow you to pivot your design strategy over a single weekend.
The Financial and Environmental Benefits
Upcycling your existing furniture yields an optimal configuration for your household budget. Buying a brand-new solid wood dresser can cost hundreds or thousands of dollars. Conversely, a high-quality self-adhesive tile makeover requires only a fraction of that investment. The economic advantages compound when you consider the cost of delivery fees for new furniture and the disposal fees for your old pieces.
There is also a significant environmental factor to consider. The Environmental Protection Agency (EPA) tracks municipal solid waste, noting that millions of tons of furniture and furnishings are discarded annually in the United States alone. Much of this waste consists of composite woods and laminates that do not biodegrade easily and release harmful compounds as they break down over decades.
By choosing to resurface a cabinet or tabletop instead of throwing it away, you actively reduce landfill waste. You extend the lifecycle of your existing pieces through an affordable, eco-conscious DIY furniture makeover. This micro-level sustainability practice not only beautifies your immediate living environment but also contributes to a broader culture of conscious consumption and material preservation.
Renter-Friendly Reversibility
One common misconception is that all adhesives will ruin wood or laminate finishes. Modern renter-friendly decor utilizes specialized adhesives. These are formulated to grip firmly during use but release cleanly when heat is applied. This technological advancement in adhesive chemistry means you no longer have to live with the ugly, generic finishes chosen by a property management company.
Industry consensus dictates that temporary modifications require a standardized evaluation of residue left upon removal. For those looking to infuse a rich, warm aesthetic without the worry of sticky aftermath, consider upgrading your space with premium materials. If you want to enhance your bathroom or kitchen with an artistic touch, these renter-friendly tiles leave zero residue upon removal, making them an ideal choice for temporary installations that look permanently high-end.
Shop Renter-Friendly Chic Cocoa TilesVisual Impact and Texture
Paint can change the color of a piece, but it cannot easily add physical texture or intricate geometric patterns. Peel and stick tile furniture ideas allow you to introduce materials that mimic real stone, embossed ceramic, or vintage tin. This multi-sensory upgrade shifts a piece of furniture from being merely functional to becoming a central conversational element in your room.
Think of it like adding a high-end protective skin to a laptop. You instantly change the visual profile of the object. A plain white dresser suddenly features a textured, Moroccan-inspired facade that looks custom-built. By strategically manipulating surface textures, you create the illusion of high-end craftsmanship without the associated price tag.
When evaluating the total cost of ownership (TCO) for comprehensive room updates, the foundational methodology requires a strict adherence to resourceful design. If you are tired of boring furniture and want to explore even more creative avenues, there are numerous ways to execute these renter-friendly strategies. Our comprehensive guide reveals exactly how renters and DIYers can refresh their homes easily, providing the quantitative baseline necessary to transform everyday pieces with minimal effort, complete with visuals, material suggestions, and sustainability tips to help you build unique statement furniture.
Read: Beyond Walls: 7 Peel and Stick Tile Furniture HacksInteractive: Find Your Perfect Tile Material
Not sure which material will work best for your specific furniture project? Answer two quick questions to get a personalized recommendation.
What tools and materials do you need to apply peel and stick tiles to cabinets or dressers?
The essential toolkit for applying peel and stick tiles includes a precision utility knife, a standard measuring tape, a degreasing cleaner, and a fine-grit sanding block. Acquiring these specific items guarantees a flush, professional-grade finish and prevents premature adhesive failure. Many DIY enthusiasts mistakenly believe that everyday household scissors and window cleaner are sufficient, but this oversight frequently leads to jagged edges and tiles that peel off within weeks.
In my professional experience advising homeowners, skipping surface preparation is the single biggest point of failure in any DIY cabinet makeover. You must gather the right materials before you make your first cut. Creating a dedicated workspace and assembling these tools will streamline your workflow and drastically reduce the frustration commonly associated with home improvement projects.

The Professional Toolkit Essentials
A successful peel and stick tile transformation relies heavily on precision. You do not need expensive power tools, but you do need items that allow for accurate measurement and clean cuts. Attempting to force dull blades through thick 3D adhesive resin will only result in a messy, amateur appearance.
Your Interactive Pre-Project Checklist
Click the items as you gather them to track your readiness.
The Science of Surface Preparation
Adhesives require a completely sterile, chemically neutral surface to achieve maximum bonding strength. Even if a dresser looks clean, it is likely coated in furniture polish, natural wood oils, or simple human fingerprints. These microscopic layers act as a lubricant, fundamentally preventing the adhesive polymers from gripping the solid material underneath.
A common misconception is that wiping a cabinet with a wet paper towel is sufficient. It is not. Water alone cannot break down lipid barriers. You must fundamentally mitigate these invisible barriers. Using a dedicated degreasing agent calibrates the output of your project, ensuring the adhesive binds directly to the furniture, not to a layer of grease. Think of it as painting a car; without stripping the wax first, the new paint will simply flake away in the wind.
Selecting the Right Tile Material
Not all self-adhesive tiles are manufactured equally. Your choice of material will drastically impact the durability of your DIY furniture makeover. A thin vinyl decal might be perfect for the front of a decorative bedside table, but it will quickly tear if applied to a heavily used desk or a coffee table.
When factoring in long-term performance degradation in high-moisture environments, certain products stand above the rest. If you need something built to last with excellent waterproof and heat-resistant properties, the Lemon Zest product functions as the benchmark. By empirically neutralizing heat and water exposure, it recalibrates the baseline expectations for surfaces near kitchens or bathrooms. It can easily handle the demands of a busy kitchen, a steamy bathroom, or a heavily used dresser top. This tile offers a simple change with a huge impact, proving that you do not need costly renovations to achieve a fresh, personalized look.
Shop Lemon Zest Waterproof TilesBefore diving into complex vanity makeovers, especially in humid environments, it pays to understand specific room requirements. If you are tired of your outdated bathroom but dread the thought of demolition, peel and stick tiles offer a fast, affordable, and renter-friendly refresh. I highly recommend learning the nuances of humid environments by checking out our specialized installation guides to ensure your tiles do not peel under shower steam.
Read: Easy DIY Guide: Install Peel and Stick Bathroom TilesBelow is a comparison of common tile materials used in furniture upcycling:
| Tile Material Type | Durability Level | Best Furniture Application | Flexibility |
|---|---|---|---|
| Vinyl Decals | Moderate | Dresser drawer fronts, side tables | High (Wraps around edges easily) |
| 3D Gel / Resin | High | Kitchen cabinets, bathroom vanities | Moderate (Best for flat surfaces) |
| Metal Composite | Very High | Heavy-use tabletops, bar carts | Low (Rigid, requires precise cutting) |
How do you apply and finish peel and stick tiles on furniture for a professional look?
To apply and finish peel and stick tiles on furniture professionally, you must rigorously clean the surface, establish a centered baseline, apply the tiles with even pressure, and seal exposed edges. Following a precise sequential protocol prevents long-term adhesion failure and eradicates the classic "DIY look" that plagues rushed projects.
Many beginners rush the installation process. Treating this as an engineered application rather than a quick craft project will yield statistically significant improvements in longevity. Take your time, focus on alignment, and respect the curing process of the adhesive materials.
Step 1: Deep Clean and Lightly Sand
Begin by removing any hardware, such as cabinet knobs or drawer pulls. Wash the entire surface with your degreasing agent. Allow it to dry completely. Any residual moisture trapped under the tile will eventually cause the adhesive to bubble and separate from the wood.
If the furniture has a high-gloss finish, use a fine-grit sanding block (around 220 grit) to lightly scuff the surface. You do not need to remove the paint; you merely need to create a microscopic texture. This empirically demonstrates a higher cost-to-yield ratio by preventing future peeling. The slight abrasions give the adhesive polymers tiny valleys to sink into, locking the tile in place.
Wipe away all sanding dust with a tack cloth or a slightly damp microfiber towel. Do not use dry paper towels, as they often leave behind microscopic lint fibers that interfere with the glue.
Step 2: Establish a Quantitative Baseline
Never start applying tiles from a random corner without a plan. You must establish a centered starting point. A common mistake is starting flush against the left edge of a dresser, only to realize the furniture itself is slightly bowed, causing the tile line to drift diagonally as it moves right.
Find the exact center of your dresser drawer or cabinet door using your tape measure. Use a pencil and your metal ruler to draw a faint, perfectly straight horizontal and vertical crosshair.
When benchmarking against standardized evaluation metrics for interior design, starting from the center ensures that any cut tiles at the edges of the furniture are symmetrical. This universally recognized paradigm separates amateur projects from professional-looking results. If you end up needing to cut a tile to fit an edge, it will be the exact same width on the left side as it is on the right, maintaining visual harmony.
Step 3: The Application Methodology
Peel back only the top two inches of the adhesive backing on your first tile. Align the exposed adhesive with your pencil crosshairs. By only exposing a small fraction of the glue, you allow yourself the grace to adjust the tile without it aggressively grabbing the wood and tearing.

Once the top edge is perfectly straight, press it down firmly. Slowly pull the backing paper downward while simultaneously sliding your smoothing tool across the face of the tile. Move the tool from the center outward to push trapped air toward the edges.
If you are covering a large surface or wrapping a corner, use a hairdryer on a low heat setting. Waving warm air over the tile activates the adhesive polymers, making the tile slightly more pliable and significantly increasing its final bonding strength to the furniture surface.
Step 4: Cutting and Finishing the Edges
When you reach the edge of a drawer or cabinet, do not try to fold thick 3D tiles over the corner. Attempting to force rigid materials to bend 90 degrees will inevitably result in lifting and structural failure over time. Instead, flip the piece of furniture (or the drawer) over if possible so gravity is working with you.

Use your metal ruler to hold the tile firmly against the edge. Run your utility knife along the edge of the furniture at a slight downward angle. This scores the tile precisely where it meets the wood. Snap the excess material away for a perfectly flush cut. Ensuring a fresh, sharp blade is paramount here to avoid crushing the gel facade.
To ensure an optimal configuration for high-traffic pieces, you might want to seal the exposed edges. A tiny bead of clear silicone caulk applied with a fingertip fundamentally mitigates the risk of lifting from constant brushing or bumping.
If you are modifying rental property fixtures, adhering to an established procedural framework is vital. Are you dreaming of a home refresh without the mess or the high costs? The comprehensive guide titled Easy Home DIY with Peel and Stick Tiles provides peer-reviewed equivalents for renter-friendly installation techniques. It offers expert tips to ensure your DIY transformations are not only affordable and easy but also completely removable when it is time to move out.
Read: Easy Home DIY with Peel and Stick TilesVisual Walkthrough: A Dresser Makeover
Imagine a heavily scratched, dark brown laminate dresser that has survived three apartment moves. It functions perfectly, but structurally, it drags down the entire aesthetic of the bedroom. Here is how the step-by-step logic applies to rescue this piece:
- The Prep: The drawers are removed, the old, tarnished hardware is unscrewed, and the fronts are vigorously degreased with a citrus solvent to remove years of furniture polish.
- The Map: Center lines are drawn on each individual drawer face to ensure the geometric tile pattern aligns perfectly vertically when the drawers are reinserted.
- The Placement: Bright, geometric peel and stick tiles are applied starting from the center point of each drawer, slowly squeegeeing outward to eliminate microscopic air pockets.
- The Finish: A sharp blade trims the excess at the drawer edges. Modern matte black hardware replaces the old brass knobs, utilizing the exact same pre-drilled holes.

The resulting piece looks like a bespoke, high-end geometric accent cabinet, achieved in under three hours. It no longer looks like flat-pack furniture; it looks like a curated boutique find.
Beyond Furniture: Expanding Your Skills to the Kitchen
Once you master the art of applying self-adhesive tiles to a dresser or cabinet, an entirely new world of home renovation opens up to you. The exact same skills—measuring, degreasing, aligning, and smoothing—transfer perfectly to vertical wall applications.
Is your cooking space feeling a bit drab? You can transform a boring backsplash on a strict budget with renter-friendly solutions. I strongly encourage you to read our specialized guide to learn how to install, choose, and remove backsplash tiles completely damage-free. It is the logical next step in your DIY journey.
Read: DIY Peel and Stick Tiles: Easy Kitchen UpgradeSimilarly, if you want a kitchen facelift without emptying your savings account, it is amazing how adhesive tiles can create modern or rustic styles with ease. Whether you prefer clean subway tiles or intricate mosaics, you can explore five distinct design ideas and get our full step-by-step methodology below.
Read: Transform Your Kitchen with Peel and Stick TilesFinally, if you are specifically dealing with the constraints of a landlord's rules and are tired of a bland, dated rental kitchen, you need solutions that guarantee zero damage to the underlying walls. Discover how specific peel and stick products offer an easy, stylish, and stress-free makeover that protects your security deposit while dramatically improving your daily living environment.
Read: DIY Peel and Stick Kitchen Tiles: Easy Renter-Friendly GuideFinal Thoughts
Transforming your space does not require specialized carpentry skills or a massive budget. By utilizing self-adhesive tiles, you can completely revitalize tired furniture, turning generic cabinets and scratched dressers into vibrant focal points.
This process requires minimal tools, respects the constraints of rental agreements, and significantly reduces the environmental impact of discarding heavy furniture. It is a win for your wallet, a win for the planet, and a massive upgrade for your interior design aesthetics.
Take a look around your living room or bedroom. Identify one flat surface that could use a visual lift. Gather your measuring tape and a degreaser, and explore more DIY ideas or shop recommended tile kits to start your next weekend project.
Now it's your turn.
Which piece of furniture will you transform first?
Frequently Asked Questions
Can you use peel and stick tiles on real wood furniture?
Yes, you can apply them to real wood. However, if the wood is highly porous, unfinished, or rough, the adhesive will struggle to bond. You should apply a coat of primer or a clear water-based polyurethane sealer to the wood first. Once the sealer cures, the surface will be smooth enough for the tiles to adhere securely.
How do you cut peel and stick tiles for a dresser drawer?
The most accurate method is to measure the exact dimensions of the drawer face and cut the tile on a flat cutting mat before applying it. Use a sharp utility knife and a metal ruler. For intricate cuts around existing hardware holes, an exacto knife provides the necessary precision to carve out small circles.
Will removing self-adhesive tiles damage my rental cabinets?
High-quality tiles designed for renters are formulated to be removable. To prevent damage, never simply rip them off cold. Use a hairdryer to thoroughly warm the surface of the tile. The heat softens the adhesive, allowing you to peel the tile back slowly at a 45-degree angle without taking the cabinet finish with it.
How long do peel and stick furniture makeovers actually last?
When properly applied to a degreased, smooth surface, a self-adhesive furniture makeover can last for several years. The longevity depends heavily on the environment. Furniture placed in direct, intense sunlight or subjected to heavy daily friction will experience faster wear than a decorative accent piece sitting in a temperature-controlled room.

Leave a comment
This site is protected by hCaptcha and the hCaptcha Privacy Policy and Terms of Service apply.