


DIY Peel and Stick Kitchen Tiles: Your Easy, Renter-Friendly Guide
Tired of staring at bland, dated kitchen walls but can’t make permanent changes? You feel stuck, wanting a home that reflects your style, but the rules of renting and the fear of losing your security deposit hold you back. We get it. A full kitchen renovation is off the table, but that doesn't mean you have to live with a space you don't love.
The Quick Answer: Are DIY Peel and Stick Tiles a Good Solution for Renters?
Yes, DIY peel and stick kitchen tiles are an excellent solution for renters. They are affordable, easy to install without professional help, and most importantly, removable without damaging the walls. With heat and water-resistant options available, they are a safe and stylish way to upgrade a kitchen backsplash temporarily.
For years, we've helped renters and DIY beginners navigate the world of home upgrades. We know your concerns: a tight budget, fear of a difficult installation, and the constant worry about what your landlord will say.
This guide is your complete roadmap. We'll show you why these tiles are the perfect renter-friendly fix. We’ll cover how to choose the right ones, install them flawlessly, and get inspired by today's best designs—all while keeping your walls (and your deposit) safe.

Why Choose Peel and Stick Kitchen Tiles in 2025?
The Question: "Feeling stuck with a dated rental kitchen and a small budget?"
The Promise: This section shows how modern peel and stick tiles offer an affordable, stylish, and damage-free solution that’s perfect for today's renter.
Peel and stick tiles have evolved far beyond the flimsy vinyl of the past. In 2025, they represent one of the smartest upgrades a renter or budget-conscious homeowner can make. They bridge the gap between temporary decor and a high-end finish.
The Ultimate Budget-Friendly Upgrade
A traditional tile backsplash, installed professionally, can easily cost $1,000 to $3,000 or more. In our experience, a DIY peel and stick project gives you a similar visual impact for a fraction of that price—often between $100 and $300 for an entire backsplash. It's a high-impact, low-cost transformation.
Designed for Renters
The biggest fear for any renter is damaging the property. Quality peel and stick tiles are made with a specific low-tack but durable adhesive. It’s strong enough to last for years but gentle enough to be removed without peeling paint or leaving significant residue when you move out.
A Common Misconception
Many people assume "stick-on" means "cheap-looking." Today’s options include stunningly realistic 3D gel tiles, metal composites, and faux stones that mimic the real thing. The key is choosing a quality product, not the cheapest sheet you can find. The difference in realism is significant.
Trending Designs for a Modern Look
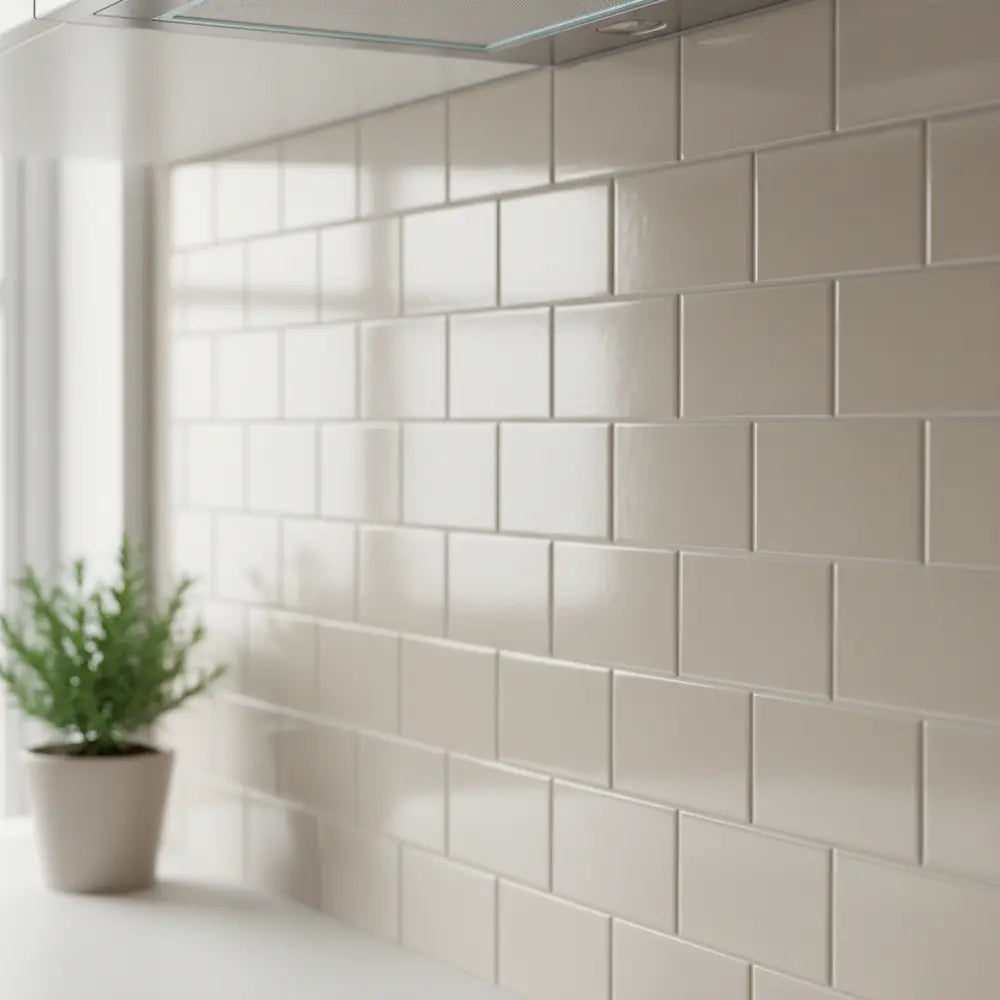
This isn’t your grandmother’s contact paper. The market is full of chic, modern designs. Think matte black subway tiles, elegant marble hex patterns, and warm, organic-looking faux wood. You can achieve a custom look that’s right on trend without any permanent commitment.
For a broader look at how these tiles can be used throughout your home, our guide on How to Use Peel and Stick Tiles in 2025 is the perfect resource for sparking creativity beyond the kitchen.
Are Peel and Stick Tiles Actually Good for Kitchen Walls?
The Question: "Will these tiles really hold up to the heat and water in a busy kitchen?"
The Promise: We'll break down the real-world durability, water resistance, and heat safety of stick-on tiles so you can install them with confidence.
It's a valid concern. The kitchen is a workhorse space, subject to splashes, steam, and heat. The good news is that manufacturers have engineered these products specifically for this environment. However, you need to know what to look for.

How Durable Are They for Renters?
For a typical renter who may stay in a property for two to five years, the lifespan of peel and stick tiles is a perfect match. Most quality brands are designed to last for years with proper installation and care. Think of it as a durable, semi-permanent upgrade that can move out right when you do.
Are They Waterproof Behind the Sink?
Most self-adhesive backsplashes are water-resistant, not fully waterproof. This is a critical distinction. They are designed to repel splashes from the sink, grease splatters, and steam. You can easily wipe them clean without water seeping through to the wall. They are perfectly suitable for a backsplash area.
A Pro-Tip for Extra Protection
If your sink area gets a lot of water traffic, we've found that running a very thin bead of clear, removable silicone caulk along the bottom edge where the tiles meet the counter provides a perfect seal. This prevents water from ever getting a chance to sneak under the edge and compromise the adhesive.
Can They Handle Heat Behind a Stove?
This is the most important safety question. The answer is yes, if you choose the right product and follow instructions. Most peel and stick tiles are made from vinyl or PVC, which can warp with high heat.
Look for products specifically rated as "heat resistant." Even with these, manufacturers require a safety buffer zone. A recent survey of top brands showed a consensus: you need at least 8-10 inches of space between the back of your stovetop and the tiles, especially with an open gas flame.
For ultimate peace of mind, especially with a high-output range, some renters install a thin stainless steel panel directly behind the stove and then tile around it. This creates a functional and stylish focal point. To understand more about safe removal when it's time to move, check out our guide to Transform & Remove Renters Peel and Stick Tiles Safely.
What Are the Best Peel and Stick Kitchen Tiles for 2025?
The Question: "There are so many options. How do I choose the right one for my kitchen?"
The Promise: This section simplifies your choice by breaking down the top styles, materials, and what to look for in a quality tile.
Walking down the home improvement aisle or scrolling online can be overwhelming. Let’s cut through the noise. The "best" tile depends on your budget, desired style, and how much realism you're aiming for.

We've seen thousands of kitchen makeovers, and the most successful ones almost always use one of these proven styles.
Key Peel and Stick Tile Styles
| Tile Style | Best For | Typical Cost | Pro-Tip |
|---|---|---|---|
| Classic Subway | Timeless, clean, modern farmhouse, or industrial looks. | $ - $$ | Choose beveled edges or 3D gel tiles for a more realistic look. |
| Faux Marble | Creating an elegant, high-end feel on a budget. | $$ - $$$ | Look for larger format tiles with varied patterns to avoid repetition. |
| Geometric/Patterned | Making a bold statement or creating a feature wall. | $$ - $$$ | Perfect for small backsplashes where the pattern can shine. |
| Natural Stone Look | Adding warmth and texture. Great for rustic or earthy vibes. | $$ - $$$ | Thicker, composite tiles often provide the most convincing texture. |
Budget vs. Luxury: What's the Difference?
The price of peel and stick tiles is usually tied to their material and thickness.
- Budget-Friendly ($): These are often thinner vinyl sheets. They are great for a super-fast, low-cost update but may look less realistic. They work best on perfectly smooth walls.
- Mid-Range ($$): This is the sweet spot. You'll find high-quality vinyl and 3D gel tiles here that offer excellent realism and durability. Brands in this category often have better adhesive and are easier to install.
- Luxury ($$$): These include thicker composite, metal, or real stone veneer tiles with an adhesive backing. They can convincingly mimic high-end materials and are great for homeowners looking for a longer-term solution.
When you're ready to explore different looks, our gallery of kitchen makeovers is a great place to start. See how others have used these styles in our article, Transform Your Kitchen with Peel and Stick Tiles.
How Do You Install a Peel and Stick Backsplash Step-by-Step?
The Question: "I’ve never done this before. What if I mess it up?"
The Promise: Follow this detailed, beginner-proof guide. We’ll walk you through every step to ensure a professional-looking finish, even if it’s your first time.
This is the most detailed section for a reason. Proper installation is 90% of the battle and is what separates a beautiful, long-lasting backsplash from one that peels. In our experience helping DIYers, rushing the prep is the number one mistake. Don’t do it!
Step 1: Gather Your Tools
You don't need a full workshop, just a few key items. Having everything ready before you start makes the process smooth and enjoyable. If you're wondering about the specifics, our article DIY Peel and Stick Tiles: Easy Kitchen Upgrade covers all the essentials you'll need for a successful project.
Installation Prep Checklist
- Tape Measure
- Pencil
- Level
- Utility Knife or Sharp Scissors
- Cutting Mat or Cardboard
- Degreasing Cleaner (like TSP substitute) & Cloths
Step 2: Prepare Your Wall Surface (The Most Crucial Step)
Your tiles will only stick as well as the surface underneath them. A clean, smooth wall is non-negotiable.
First, thoroughly clean the wall with a degreasing agent to remove any grease, dust, or grime, especially behind the stove. Let it dry completely—we recommend waiting at least an hour. Any moisture or oil will prevent the adhesive from curing properly.
If your wall is textured, the tiles may not adhere well. A common solution is to sand it down lightly or apply a skim coat of joint compound for a smoother surface. For renters, a simpler option is to install a thin, smooth panel of hardboard first.
Step 3: Plan Your Layout
"Measure twice, stick once" is the mantra here. Find the center of your main wall and use your level to draw a faint vertical and horizontal line. This grid will be your guide. Starting in the center and working your way out prevents you from ending up with awkward, thin slivers of tile in the most visible spots.
Lay out a few tiles on the counter to see how the pattern connects. This helps you visualize the project and plan your cuts around outlets and corners before you start peeling any backings. For more helpful tips on transforming your cooking space with minimal effort, our guide on How to DIY a Peel and Stick Kitchen in 2025 has you covered.
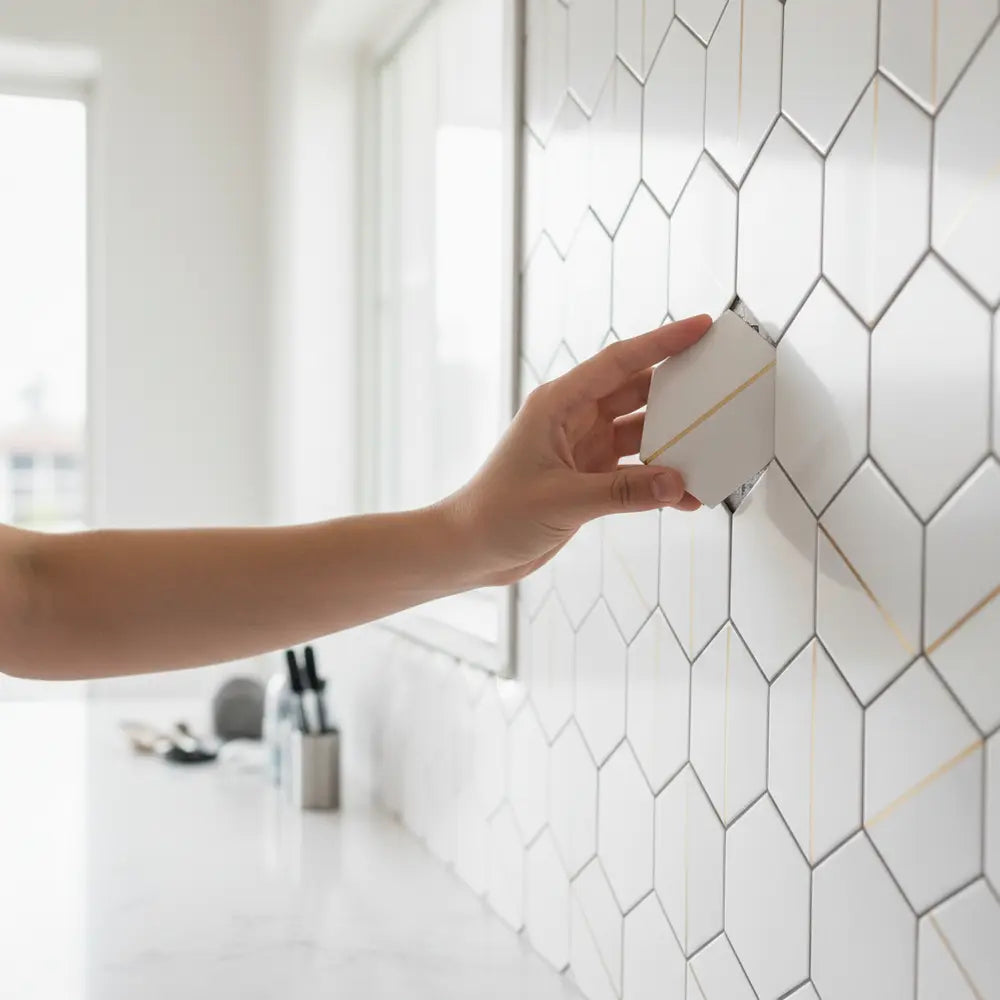
Step 4: Apply the First Tile
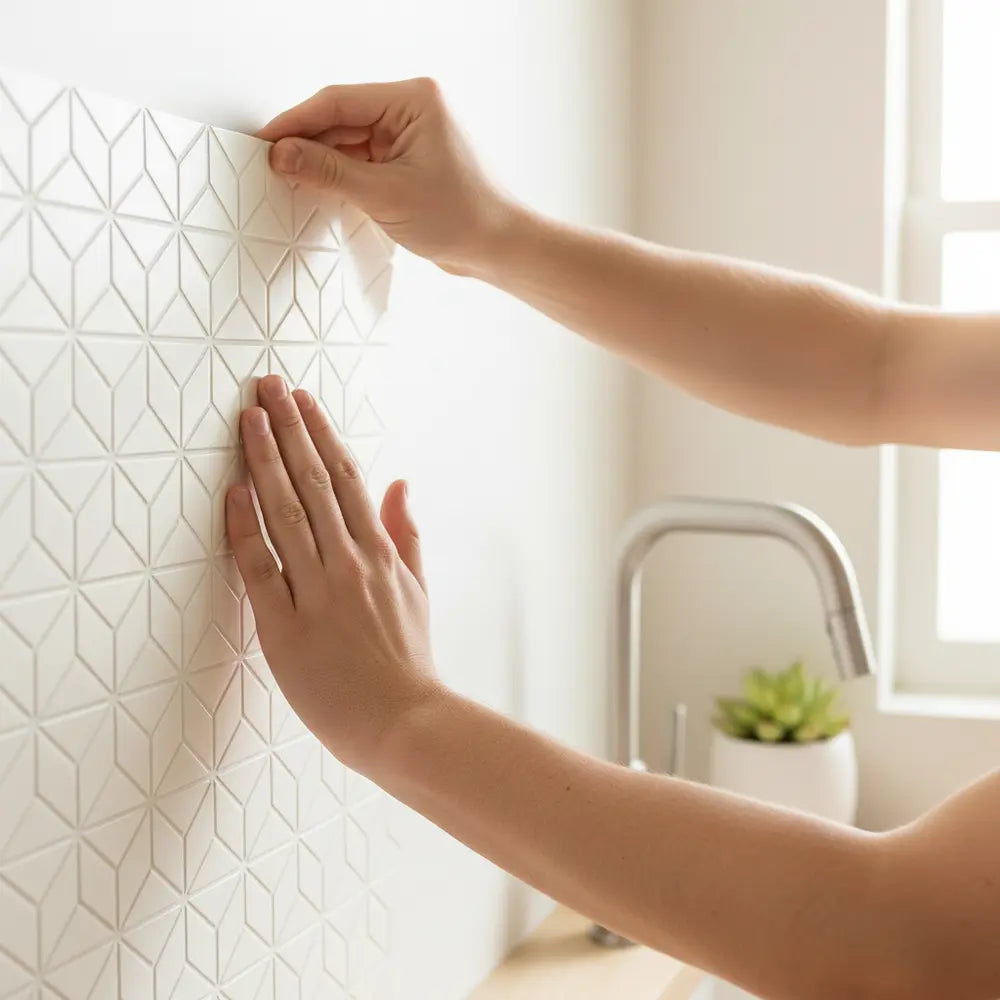
This is your anchor. Peel only the top few inches of the backing paper away. Align the tile carefully with your guideline. Lightly press the exposed adhesive to the wall. Once you are certain it's perfectly straight, continue pulling the backing off while you smooth the tile down from the center out.
Using a plastic smoother helps press the tile firmly and removes any air bubbles. Don't skip this; consistent pressure activates the adhesive for a strong bond.
Step 5: Cut Tiles for Obstacles
You will inevitably need to cut tiles to fit around outlets, windows, or cabinets. Measure the location of the obstacle and mark it on the front of your tile. Place the tile on a cutting mat and use a sharp utility knife to score it along your line. You can then snap it cleanly.
For outlets, it's often easiest to make an "X" cut and trim the flaps to size. The outlet cover will hide any minor imperfections.
Step 6: Overlap and Finish
Most peel and stick tiles are designed with a small overlapping "grout" edge. Make sure you follow the manufacturer's instructions for this overlap to create a seamless, waterproof seal. Work your way across and up the wall, taking your time with each tile.
Once all tiles are in place, go back over the entire surface one last time with your smoother, paying special attention to the edges.
This process transforms a kitchen in just a few hours. For a deeper dive into the nuances of installation, our Easy Guide: Install Peel & Stick Subway Tiles is the definitive resource.
How Do You Troubleshoot Common Issues?
The Question: "What do I do if my tiles start peeling or an edge lifts up?"
The Promise: Don’t panic. Here are the simple, expert fixes for the most common peel and stick problems.
Even with a perfect installation, you might run into a small issue. Here’s how to handle the three most common problems we see.
Problem: My Tiles Are Slipping or Peeling Off the Wall.
This is almost always caused by one of two things: an improperly cleaned wall or a highly textured surface. If it's just one or two tiles, you can try to fix them.
Gently peel the tile off. Clean both the wall behind it and the adhesive on the tile with rubbing alcohol to remove any dust or grease. Let it dry. For a stronger bond, you can use a spray adhesive like 3M Super 77. A light mist is all you need. Press the tile back firmly.
Problem: The Edges Are Lifting Near the Sink.
This happens when water gets underneath the tile before the adhesive has fully cured (which can take up to 48 hours). The fix is simple and also a great preventative measure.
Dry the area completely. Apply a small amount of extra-strong, waterproof glue (like Loctite Power Grab) under the lifted edge and press it down firmly. For a permanent seal, run a thin bead of clear kitchen and bath caulk along the seam where the tiles meet the countertop.
Problem: Tiles Are Warping or Discoloring Behind the Stove.
If this happens, it means the tiles are too close to a direct heat source. Unfortunately, a warped tile cannot be fixed and must be replaced.
First, check your stove's manual for its rear clearance requirements. You may need to pull the stove an inch or two away from the wall. To prevent it from happening again, the best solution is to create a buffer zone with a piece of sheet metal or a tempered glass panel.
What Are Some Design Ideas for a Stylish Peel and Stick Kitchen?
The Question: "How can I make these tiles look intentionally stylish and not like a cheap fix?"
The Promise: We’ll share inspiring, on-trend design strategies to make your peel and stick backsplash a stunning focal point.
The key to a great outcome is treating your peel and stick tiles as a deliberate design element. Don't just cover an old backsplash; create a new look.
The Modern Subway Tile Takeover
You can't go wrong with classic subway tile. For a 2025 update, look for tiles in a matte finish or an elongated size. A dark grout line (even a printed one) with white tiles creates a sharp, graphic look that feels both modern and timeless.
Luxury Looks for Less
Get the Carrara marble look without the price tag or maintenance. High-quality marble-look peel and stick tiles, especially in a herringbone or hexagon pattern, can look shockingly realistic. The trick is to buy enough tiles to ensure you get a good variation in the veining pattern so it doesn't look repetitive.
Small Kitchen, Big Impact
If you have a small kitchen, use your backsplash to your advantage. Light-colored and reflective tiles, like those with a glossy finish or mother-of-pearl look, will bounce light around the room, making it feel brighter and more spacious. If you want to dive deeper into the process and see the best designs of 2025, explore our comprehensive guide on How to Install Peel and Stick Tiles & Best Designs for 2025.
Go Bold with Patterns
A backsplash is the perfect place to play with color and pattern without overwhelming a room. Moroccan-inspired, geometric, or floral patterns can inject personality into a neutral kitchen. They turn the wall into a piece of art.
Which peel and stick tile design do you like most?
We are constantly collecting new ideas from talented renters. For a stream of inspiration, follow us on Pinterest for more renter makeovers. Our board is filled with amazing transformations that prove what's possible.
How Do You Maintain and Remove Peel and Stick Tiles?
The Question: "How long will they last, and will they really come off without damage when I move out?"
The Promise: This section gives you the straightforward guide to cleaning, maintaining, and—most importantly—safely removing your tiles to get your full deposit back.
Your project isn't truly finished until you know how to care for it and, eventually, undo it. The process is just as simple as the installation.
How Long Do They Last and How Do You Clean Them?
With a good installation, you can expect your peel and stick backsplash to look great for 3-5 years, or even longer. Cleaning is simple: just use a soft cloth with mild soap and water. Avoid abrasive cleaners or scrubbing pads, as they can scratch the surface and dull the finish.
Replacing a Single Damaged Tile
Accidents happen. If a tile gets stained or nicked, you don't have to redo the whole wall. Use a hairdryer to gently warm the single damaged tile for about 30-60 seconds. This will soften the adhesive. Then, use a putty knife to carefully lift a corner and peel it off. Clean the wall and apply a new tile.
The Move-Out: Safe and Damage-Free Removal
This is the moment of truth for every renter. Don't just rip them off the wall! A little patience goes a long way. For an even more in-depth look at damage-free application and removal, our Removable Kitchen Tiles: Peel & Stick Backsplash Guide is an invaluable resource.
- Warm It Up: Use a hairdryer on a medium heat setting, holding it a few inches from the tile. Work in small sections, warming the surface for about a minute.
- Peel Slowly: Start at a top corner and begin peeling down and away from the wall at a low angle (not straight out). The warmth makes the adhesive pliable and helps it release cleanly.
- Handle Residue: If any sticky residue is left behind, a citrus-based cleaner like Goo Gone is your best friend. Apply it to a cloth, wipe the residue away, and then clean the wall with soap and water.
For a complete visual walkthrough and extra tips, the most valuable resource is our dedicated article: Transform & Remove Renters Peel and Stick Tiles Safely.
Where Can You Buy the Best Tiles in 2025?
The Question: "I'm ready to start, but where do I find high-quality tiles that won't peel off in a week?"
The Promise: We'll point you to the most reliable places to shop and tell you exactly what to look for to ensure you get a great product.
Knowing where to shop is as important as knowing how to install. Quality can vary wildly from one seller to another.
Top Online Marketplaces
Amazon and Wayfair have the largest selections, but specialty online retailers focusing only on wall coverings often have more unique, higher-quality designs. Don't forget home improvement store websites like HomeDepot.com and Lowes.com, which allow you to check local stock.
How to Choose Wisely on Amazon
When shopping on a massive marketplace like Amazon, be a savvy consumer. Don't just look at the star rating.
- Read 2024/2025 reviews, especially those with customer photos. This gives you a real-world look at the color and quality.
- Check the product specifications for tile thickness (thicker is often better) and heat-resistance ratings.
- Order a sample pack if available. It's worth spending a few dollars to see and feel the product before committing to a whole project.
Your Kitchen Upgrade is Just a Weekend Away
You don't have to live with a kitchen that feels uninspired. With today's beautiful and durable DIY peel and stick kitchen tiles, a stunning transformation is within your reach. It's affordable, fast, and completely renter-friendly.
You have the knowledge to choose the right product, install it with confidence, and handle any small issue that comes up. Remember to double-check those heat-resistance ratings for the area behind your stove, and always take your time with wall prep.
Go ahead and give your kitchen the stylish upgrade it deserves. You’ll be amazed at what you can accomplish in just a few hours.
For more clever design hacks and renter-friendly projects delivered straight to your inbox.
Frequently Asked Questions
Can you put peel and stick tiles over existing tiles?
Yes, in most cases, you can. The key is that the existing surface must be completely clean, smooth, and non-porous. You cannot apply them over heavily textured or uneven ceramic tiles. If your existing grout lines are deep, you may need to fill them with a skim coat to create a flat surface for the new tiles to adhere to properly.
How much extra tile should I buy for mistakes?
We always recommend buying at least 10% more tile than your measurements call for. This "waste factor" accounts for any mis-cuts, mistakes, or oddly shaped areas. It's also a great idea to have a few extra tiles on hand for any future repairs if a tile gets damaged.
Will the printed grout lines look fake?
The realism of grout lines has improved dramatically. Higher-quality 3D gel tiles or thicker composite tiles have recessed "grout" that looks much more authentic than a simple printed line on a flat vinyl sheet. Ordering a sample is the best way to see if the quality meets your standards.
Do I need to apply real grout to peel and stick tiles?
No, you should never apply traditional grout to peel and stick tiles. These products are designed to be a complete, self-contained system. The tiles themselves are waterproof, and the overlapping edges create a seal. Adding grout can damage the tiles and will make them impossible to remove without destroying the wall.

Leave a comment
This site is protected by hCaptcha and the hCaptcha Privacy Policy and Terms of Service apply.