












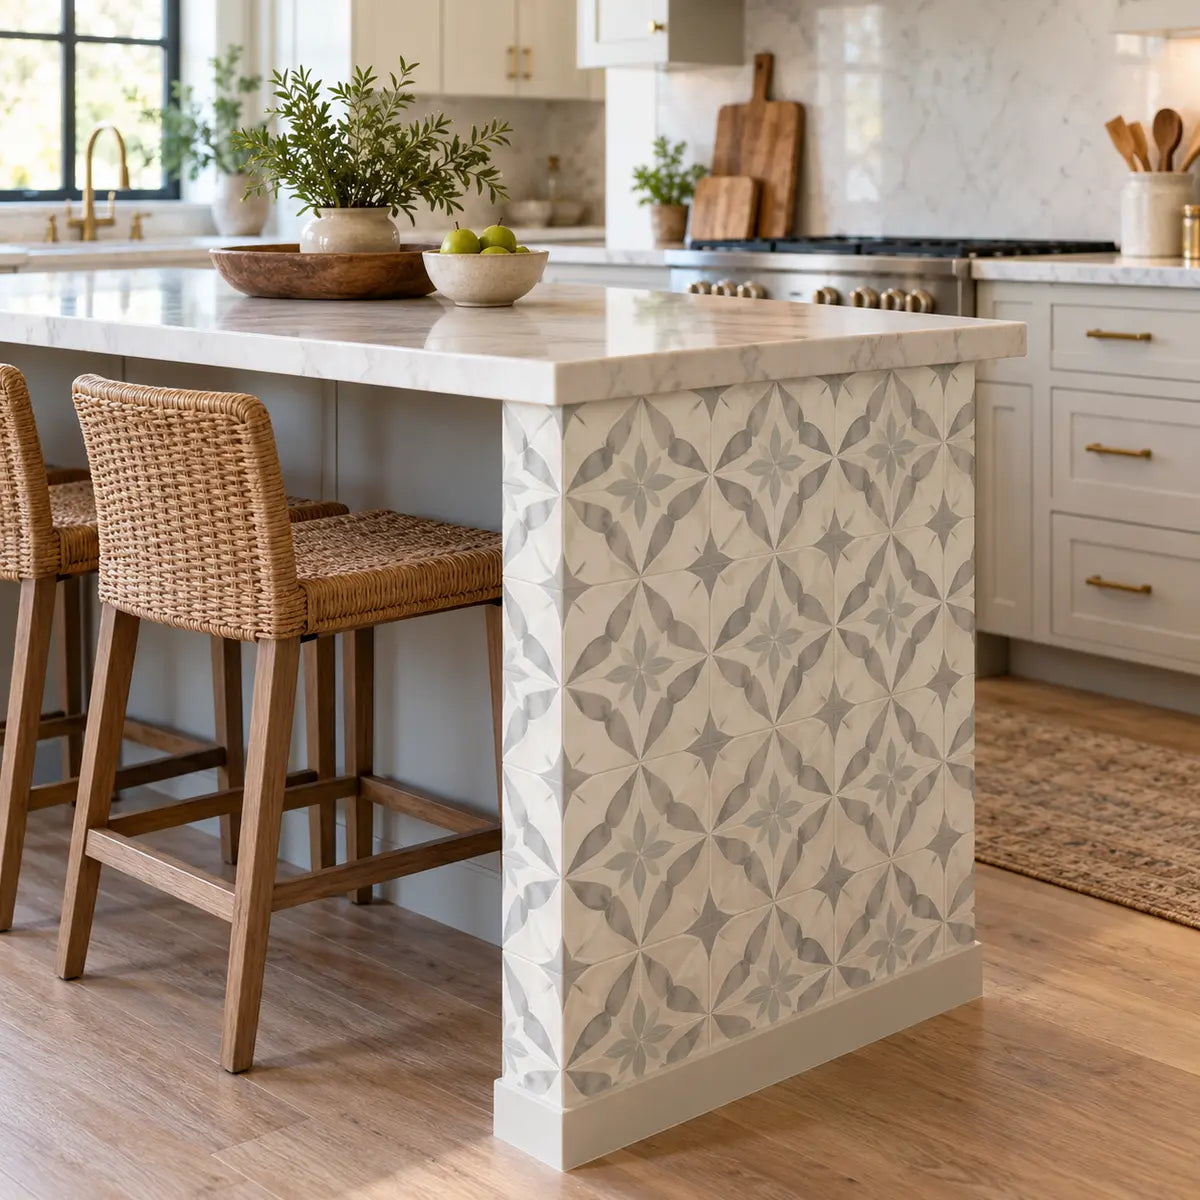
The exposed end of a kitchen peninsula is where a small layout mistake becomes easy to see. A pattern can drift across the corner, a seam can land in the main sightline, or a raw edge can make the whole project look unfinished.
You can tile a kitchen peninsula end with peel-and-stick tile when the surface is suitable, the selected product is approved for that kind of vertical application, and the corner plan is tested before adhesive is exposed. The cleanest result comes from a seam-first workflow:
- Inspect the surface and confirm the tile format.
- Measure the adjacent face, end face, corner, and exposed edge.
- Decide where the seam will be least noticeable.
- Build a cut list and dry-fit the complete arrangement.
- Test the corner treatment with the backing still attached when the product allows it.
- Apply the tile in a controlled order.
- Press the tile evenly and finish the exposed edge according to the selected product’s instructions.
This guide focuses on the difficult part that many backsplash tutorials skip: the exposed peninsula end and the outside corner where two visible planes meet. It explains how to decide whether to wrap, stop, or use an edge treatment; how to continue a pattern around the corner; how to cut the tile without wasting pieces; and how to correct common problems before they become permanent.
Product-specific limits always control the installation. The checked Stickwoll Tidal Plaid listing describes a 23 × 23 cm self-adhesive, grout-free wall tile for smooth, clean, dry, stable interior-wall surfaces. That information applies to the checked Tidal Plaid listing, not automatically to every Stickwoll pattern or format. Stickwoll’s checked Tidal Plaid product listing supports that boundary.
Can you install peel-and-stick tile on a kitchen peninsula end?
Yes, a peninsula end can be a workable location when it behaves like a suitable vertical wall surface and the tile format can be fitted around the corner without forcing it. The surface should be smooth, clean, dry, stable, and free from peeling paint, heavy texture, dust, grease, movement, or moisture problems.
A peninsula end is different from a countertop or floor. It is a vertical surface, but it often receives more touching, bumping, cleaning, and side-angle viewing than a normal backsplash. The exposed end also has an outside corner, sometimes called a convex corner—a corner that projects outward toward the room. That geometry affects the seam, the pattern, and the way the tile edge behaves.
The first decision is not which pattern looks best. It is whether the project has a reasonable installation path.
Check the substrate before you buy tile
For the checked Stickwoll product, the listed suitable surfaces include smooth painted walls, smooth existing ceramic or glazed wall tile, and clean, non-textured glass or mirror-like panels. Textured, dusty, peeling, damp, or unstable surfaces are outside that stated boundary. The listing also separates wall use from floors and countertops, so treat the peninsula end as a vertical wall-like surface rather than extending the product into the worktop or floor. The product listing is the controlling source for the checked format.

Look closely at both faces:
- Adjacent face: the long side or return next to the peninsula end.
- End face: the exposed terminal panel that faces the room.
- Outside corner: the line where those two planes meet.
- Top edge: the boundary below the countertop or overhang.
- Bottom edge: the point where the tile meets the floor, toe kick, or baseboard.
- Free edge: any side edge that remains visible from the room.
Run your hand over the surface. You are looking for raised paint edges, loose coating, grout ridges, loose laminate, deep scratches, or a soft area that moves when pressed. A peel-and-stick tile follows the surface beneath it. It does not flatten a wall by itself.
A pressure-sensitive adhesive, the type commonly used on peel-and-stick products, develops contact as the adhesive wets against the surface. A 2024 review of pressure-sensitive acrylic adhesives describes contact formation, viscous flow, wetting, tack, and the role of applied pressure and dwell time in adhesive behavior. The review discusses pressure-sensitive adhesive systems generally; it does not test Stickwoll tile or a peninsula corner. See the Springer Nature review of pressure-sensitive acrylic adhesives for that general mechanism.
That mechanism explains a practical rule: firm pressure helps a clean, well-prepared surface make contact, but pressure cannot rescue dust, dampness, loose paint, an uneven substrate, or a tile that is being bent beyond its approved use.
Use a hidden test area when the surface is uncertain
A test patch is especially useful if:
- The peninsula is painted with a coating you cannot identify.
- The surface is an older laminate or panel.
- You are covering smooth existing tile.
- You rent and need to understand removal risk.
- The tile will sit near routine splashes or a warm appliance.
- The corner surface has been repaired or repainted.
Place a small piece in a hidden location, such as the back of the peninsula or an area that will later be covered by a cabinet accessory. Watch how it adheres and how the substrate responds when you lift it according to the product instructions. Stickwoll advises testing a hidden area because removal can vary with the paint, substrate, surface condition, and installation time. Other manufacturers give similar test-patch guidance for their own products.
A test patch answers a narrow question: Does this piece appear to contact this surface under these conditions? It does not prove that every corner, edge, seam, or exposed area will perform the same way. Do not treat it as a guarantee of damage-free removal, waterproofing, or long-term adhesion.
For more preparation detail, see peel-and-stick tile surface preparation guidance before measuring the full project.
Check the location’s exposure
The checked Stickwoll listing describes routine splash and wipe-clean use, while directing users to avoid prolonged water exposure, direct flame, and concentrated heat. That distinction matters at a peninsula because one end may be near a sink, cooktop, toaster oven, or frequently handled passage.
Do not assume that a product described as suitable for routine splashes is waterproof at the seams, edges, or substrate. A face may resist ordinary wiping while the adhesive or wall beneath it remains sensitive to moisture. If the peninsula end sits beside a heat source, check the exact product documentation before proceeding. The checked Stickwoll page does not provide a universal temperature limit or distance requirement.
What should you gather before measuring and cutting?
Prepare the complete work area before opening the tile package or removing any backing. The most useful tools are the ones that help you record the real geometry, protect the pattern, and make a reversible test fit.
Materials checklist
Gather:
- The selected peel-and-stick tile, with enough matching pieces for both visible planes and planned mistakes.
- The product packaging and current installation instructions.
- A tape measure.
- A steel ruler or straightedge.
- A carpenter’s square or small combination square.
- A level.
- A pencil or fine-tip marker.
- Low-tack painter’s tape.
- Paper, poster board, or thin cardboard for templates.
- Scissors if the product instructions identify them as suitable.
- A sharp utility knife only if the selected product instructions permit it.
- A clean cutting mat or sacrificial board.
- A scraper, card, or smoothing tool appropriate for the product.
- A soft cloth or non-abrasive cleaning material.
- A camera or phone for recording the dry-fit layout.
- A small flashlight for inspecting the corner and edge.
- A dustpan or vacuum for keeping the cutting area clean.
Do not add construction adhesive, caulk, grout, primer, or trim simply because the surface is difficult. Those materials can change how the product bonds and may void the product’s intended installation method. Use them only when the selected manufacturer documentation identifies them as compatible.
The checked Tidal Plaid listing identifies the product as grout-free. For that format, real grout is not part of the stated installation. A printed or molded grout line may form part of the appearance, but grout should not be added as a way to hide a poorly aligned outside-corner seam unless the exact product instructions approve it.
Protect the work area
Clear the counter and floor around the peninsula. You need enough room to step back and view the corner from the same angles people use in the kitchen. Cover the countertop if your cutting work could scratch it, and keep adhesive surfaces away from dust, crumbs, oil, and cleaning residue.
The corner should be visible from at least three positions:
- Straight on to the end face.
- At an angle looking along the adjacent face.
- From the normal walking path through the kitchen.
A seam that appears acceptable from directly in front may look prominent when light travels across the corner from the side.
Label every plane
Create simple labels before measuring:
-
A= adjacent face. -
E= end face. -
C= outside corner. -
T= top boundary. -
B= bottom boundary. -
F= free or exposed edge.
Mark the same labels on your paper template, photos, and cut list. This sounds basic, yet it prevents one of the most common errors: cutting a piece for the end face and then turning it around so the pattern or finished edge faces the wrong direction.
How do you prepare the surface for peel-and-stick tile?
The surface must be smooth, clean, dry, firm, and stable before installation. Preparation means correcting the conditions that prevent contact; it does not mean applying every product or process commonly used for traditional tile.
Smooth the problem areas first
Inspect the surface under angled light. A side light reveals shallow ridges and raised paint edges that may disappear under ordinary room lighting. Mark each defect with painter’s tape.
Pause the installation if you find:
- Peeling or flaking paint.
- Heavy wall texture.
- Loose laminate or paneling.
- Soft drywall or swollen material.
- Active dampness or recurring condensation.
- Grease that remains after cleaning.
- Large gaps, deep holes, or uneven transitions.
- A corner that moves when pressed.
- A glossy coating that the selected product does not identify as compatible.
The checked Stickwoll guidance calls for a smooth, clean, dry, stable interior-wall surface and identifies textured walls, dusty surfaces, and peeling paint as unsuitable conditions. General manufacturer guidance from WallPops and Aspect also emphasizes firm, dry, smooth, clean substrates and correcting surface problems before installation. Exact preparation steps differ by product, so follow the selected tile’s instructions rather than importing a method from another brand. The WallPops installation guidance for peel-and-stick backsplash and the Aspect instructions provide comparable manufacturer examples within their own product boundaries.
Clean without leaving a film
Kitchen surfaces can look clean while carrying a thin layer of cooking oil. That film can interfere with adhesive contact. Clean according to the selected product instructions, then allow the surface to dry fully.
Avoid leaving behind:
- Soap residue.
- Wax.
- Oily cleaner.
- Dust from sanding.
- Loose lint.
- Moisture trapped at the corner.
- Cleaner pooled along the bottom edge.
If the product instructions do not identify a specific cleaner, do not assume a stronger cleaner is better. The correct cleaning method depends on the coating and substrate. A mild residue-free process that leaves the surface dry is preferable to a harsh treatment that damages the paint or leaves its own film.
Treat fresh paint and primer as product-specific conditions
Different manufacturers publish different drying and acclimation instructions. WallPops identifies at least 48 hours of acclimation and a longer cure period for newly painted surfaces. Smart Tiles provides separate periods for primer and fresh paint. Those examples apply to those products and are not universal Stickwoll requirements. The checked Stickwoll page does not provide equivalent timing.
Use the exact selected Stickwoll package or product page for:
- Paint-cure timing.
- Primer compatibility.
- Acclimation.
- Installation temperature.
- Humidity limits.
- Post-installation protection.
- Removal guidance.
Do not substitute a number from another manufacturer simply because it is easy to find. If the exact requirement is unavailable, wait until the surface is visibly and physically stable, dry, and suitable under the product’s stated conditions, and contact the manufacturer for a product-specific answer when the project is uncertain.
Confirm the countertop and base conditions
A peninsula often has a countertop overhang, an uneven underside, a baseboard, or a toe kick. Decide where the tile should stop before you cut.
You may need to account for:
- A countertop lip that hides the top cut.
- A rounded countertop edge.
- A gap between the end panel and the floor.
- A baseboard that remains in place.
- A cabinet door or drawer that opens close to the tile.
- A side panel that is slightly proud of the adjacent face.
- A corner bead or decorative molding.
The tile should finish against a boundary that looks intentional. A narrow sliver at the top or bottom can be more distracting than a deliberate gap or trim line. Record the visible area, not just the nominal cabinet dimensions.
How do you measure a kitchen peninsula end for peel-and-stick tile?
Measure the adjacent face and end face separately, then record the corner and edge conditions. Do not assume that the corner is perfectly square or that the two surfaces have identical heights.
Measure each plane at several points
For the adjacent face, record:
- Left height.
- Center height.
- Right height.
- Width at the top.
- Width at the middle.
- Width at the bottom.
- Distance from the nearest visible cabinet feature.
- Location of any outlet, switch, bracket, or molding.
For the end face, record:
- Height at the left.
- Height at the center.
- Height at the right.
- Width at the top.
- Width at the center.
- Width at the bottom.
- Distance from the countertop edge.
- Distance from the floor or baseboard.
- Location of any exposed side edge.
Write down the smallest usable dimension when deciding how much area a piece must cover. Write down the largest dimension when deciding whether the surface is out of square. The difference tells you where a tapered cut or deliberate reveal may be needed.
Measure the corner as a real object
Place a straightedge against each plane near the corner. Check whether the corner is:
- Sharp and square.
- Slightly rounded.
- Beveled.
- Open or separated.
- Wavy or irregular.
- Covered by a corner bead or existing trim.
A full tile can sometimes appear to meet a perfect corner in a sample photo, yet fail on a real peninsula because the two faces are not on the same plane. The corner may also be slightly wider at the top than the bottom.
Make a paper template of the corner area. Hold the paper against the adjacent face, wrap or fold it carefully across the corner only as a test, and continue it onto the end face. Mark the top, bottom, and viewing direction. The template records the actual geometry more accurately than a single tape-measure reading.
A template-first process is also useful for exposed ends and irregular cuts. The Stickwoll guide to cutting peel-and-stick tile around edges recommends keeping the backing attached while transferring the actual shape and testing the cut before applying firm pressure.
Calculate tile quantity from the cut map
Do not estimate the quantity from the end face alone. Count the pieces needed for:
- Full pieces on the adjacent face.
- Full pieces on the end face.
- Corner pieces.
- Top and bottom cuts.
- Edge strips.
- Pattern-matching replacements.
- At least one practice or mistake piece.
For a checked Tidal Plaid product, the listed tile size is 23 × 23 cm, and the listing identifies packs of one or five tiles. That dimension belongs to the checked product listing only. Use the actual dimensions of the selected product when making your cut map.

A simple cut-list table can look like this:
| Label | Location | Finished size | Pattern direction | Edge treatment | Notes |
|---|---|---|---|---|---|
| A1 | Adjacent face, upper left | Measure actual opening | Match neighboring repeat | Hidden at top | Keep backing attached |
| A2 | Adjacent face, lower right | Measure actual opening | Continue horizontal line | Baseboard boundary | Check floor variation |
| E1 | End face, upper center | Measure actual opening | Face room | Visible side edge | Photograph dry fit |
| C1 | Outside corner | Template size | Test wrap or separate cut | Planned seam | Do not improvise |
| F1 | Free edge | Strip or cut piece | Align with face pattern | Trim or clean cut | Confirm compatibility |
Write the actual measurements on the piece or template. A label such as “E1—right side—top cut” is more useful than a loose pile of unmarked shapes.
Use a reference line
The first reference line should be visible from the primary viewing direction. It may be:
- A level line below the countertop.
- A vertical line at the end face.
- A pattern line that should remain continuous.
- The edge of a full tile that will be most visible.
Use a level to draw a light reference line. A cabinet, countertop, or floor can appear level while being slightly out of level. If you start from a crooked visual boundary, every row may amplify the error.
If the tile has a directional pattern, mark the top of every piece with a small arrow on the removable backing. This is especially useful for plaid, brick, wood, geometric, and printed patterns where a rotated piece can look like a seam problem.
Which seam location makes the peninsula corner look intentional?
The best seam is usually the one that is easiest to control and least exposed to direct viewing. A technically smaller seam can still look worse if it sits on the front edge, crosses a strong pattern line, or catches side light.
Think of the corner as a visual transition between two planes. Your goal is to make the transition look deliberate.
Compare the main seam strategies
| Strategy | Best fit | Visual strength | Main risk |
|---|---|---|---|
| Continuous wrap | Product is flexible and the exact instructions allow the bend or wrap | Fewest visible joins across the corner | Stretching, cracking, lifting, or pattern distortion |
| Separate face pieces with a controlled corner seam | Rigid, thick, or uncertain tile format | Predictable cuts and easier replacement | Seam remains visible if the pattern is not planned |
| Stop before the corner and use an approved edge treatment | Free edge or decorative transition is acceptable | Deliberate finish can look clean | Requires compatible trim or a clear stopping detail |
| Stop on one plane and begin on the other | Corner geometry is irregular or wrap cannot be tested | Simple installation | The corner can look abrupt or unfinished |
A continuous wrap can create the most unified appearance, yet it is the strategy that most depends on the tile’s flexibility, thickness, backing, adhesive, and product-specific instructions. The checked Stickwoll page confirms layout previewing, basic trimming, and repositioning before firm pressure, but it does not give a universal method for folding, scoring, bending, or overlapping a tile around a convex peninsula corner.
Smart Tiles provides a convex-angle instruction for one of its own flexible products. That guidance cannot be transferred automatically to Stickwoll or another tile construction. Treat any bend as a product-specific test, not as a general peel-and-stick rule. See the Smart Tiles FAQ and product-specific installation guidance for that separate boundary.
Place the seam where the eye already expects a break
If you need separate pieces, consider these seam locations:
- At the exact outside corner, where the change of plane naturally creates a visual break.
- On the less visible side of the corner.
- Along an existing cabinet edge or vertical shadow line.
- Where the pattern already contains a dark line or grout-like division.
- Away from the center of the end face.
- Away from a strong horizontal stripe that would reveal a height mismatch.
Avoid placing the seam:
- Across a large uninterrupted graphic.
- At eye level directly facing the room.
- In the middle of the peninsula end when the pattern has a strong center.
- Where the countertop overhang creates a bright highlight.
- Along an irregular corner that will make the gap widen and narrow.
- At an edge that receives repeated hand contact.
The seam should be planned with the pattern, not after the pattern has already been cut.
Use the corner treatment decision aid
Use the following decision path before opening the adhesive:
-
Is the selected product’s exact documentation clear about bending or wrapping around a convex corner?
- If yes, continue only within those instructions and test the bend with the backing attached if permitted.
- If no, treat a continuous wrap as unconfirmed.
-
Is the tile flexible enough to follow the corner without stretching, whitening, cracking, buckling, or lifting?
- If no, use separate face pieces or a planned stop.
- If uncertain, test one spare piece first.
-
Does the pattern remain aligned through the bend?
- If yes, a wrap may be visually suitable.
- If no, a separate seam may look more intentional.
-
Will the free edge remain visible?
- If yes, plan a clean cut or a product-approved edge treatment.
- If no, a hidden cut may be sufficient.
-
Can you dry-fit the full corner from normal viewing angles?
- If no, do not expose adhesive yet.
The static comparison above is the complete decision aid: use the wrap only when product instructions, material behavior, geometry, and pattern alignment all support it. If one of those conditions fails, a controlled seam or planned edge treatment is usually easier to judge.
How do you dry-fit the pattern before exposing adhesive?
Dry-fit the adjacent face, outside corner, end face, and free edge as one arrangement. A dry fit is a rehearsal that lets you judge the pattern and seam while the pieces can still be moved.
Keep the backing attached when the product allows it
Some self-adhesive tile systems specifically direct installers to leave the liner attached during dry fitting and cutting. Aspect gives that instruction for its stone tile system. The checked Stickwoll page directs users to place several tiles to preview and plan, but does not state that every Stickwoll format must be dry-fitted with its liner attached. Confirm that the technique suits your selected product.
When the backing remains attached:
- Use painter’s tape to hold pieces temporarily.
- Mark the top and installation position.
- Keep cut edges identifiable.
- Avoid pressing the adhesive into the substrate.
- Take photos from the main viewing angles.
- Compare the corner under both daylight and room lighting.
Do not rely on a single piece held loosely in your hand. The pattern can shift when the adjacent pieces are placed beside it.
Dry-fit in the order the eye will read the corner
Start with the most visible plane, usually the end face. Place the main pieces without pressure. Then add the corner piece or seam piece. Finish with the adjacent face.
Look for:
- Whether the pattern line reaches the corner at a sensible point.
- Whether a narrow strip appears at the top or bottom.
- Whether the corner seam lands in a dark or light part of the design.
- Whether the end face looks centered.
- Whether the adjacent face starts with an awkward partial tile.
- Whether the free edge exposes a printed side, white backing, or raw substrate.
- Whether the top and bottom cuts remain parallel to the countertop and floor.
- Whether the corner piece twists or buckles.
If the pattern is directional, compare the repeat at the corner. A plaid or geometric pattern may require a piece to be shifted by a fraction of the tile width so the lines meet more naturally. That adjustment should happen in the cut map, not after adhesive has bonded.
Photograph the layout
Take close-up photographs of:
- The full peninsula from the room.
- The corner from the main walking direction.
- The seam at eye level.
- The top cut below the countertop.
- The bottom cut near the floor or baseboard.
- The free edge.
- Any pattern repeat that must align.
A photograph often reveals a seam more clearly than standing close to the work. Zoom in on the corner and inspect whether the eye follows the seam immediately. If it does, move the seam or change the treatment before cutting finished pieces.
Make a full-size corner template
For a separate corner seam, make a template for both faces. For a possible wrap, make a template that follows the actual corner and extends far enough onto both planes to show how the pattern will turn.
Mark:
- The direction of the pattern.
- The top edge.
- The bottom edge.
- The seam or bend line.
- The visible side.
- The side hidden by the cabinet or countertop.
- The amount of material that must remain on each plane.
Transfer the template to the tile backing or a sacrificial piece first. A template gives you a low-cost way to test an irregular corner before cutting the final decorative tile.
How do you cut peel-and-stick tile for a peninsula end?
Cut the piece from a measured template, keep the pattern direction visible, and test the cut before applying pressure. Use only the cutting tool and corner treatment that the selected product instructions permit.
Start with the simplest cut
For a straight top, bottom, or side cut:
- Place the tile face down or backing side up according to the product instructions.
- Transfer the measurement to the removable liner.
- Mark the finished edge clearly.
- Use a straightedge as a guide.
- Cut slowly without stretching the material.
- Label the piece before moving it.
- Dry-fit it in its exact position.
The checked Stickwoll listing identifies scissors as a recommended tool for the checked Tidal Plaid product. It does not establish that every Stickwoll format has the same cutting behavior or that every corner should be scored and bent.
If the tile is thick, rigid, textured, or layered, the cutting method may differ. Check the exact instructions before using a utility knife, scoring the face, or folding the piece.
Cut the corner as a controlled experiment
Do not cut the finished corner piece from your best tile until you have tested the shape on paper or a spare.
For a separate corner seam:
- Cut the adjacent-face piece to finish at the planned seam.
- Cut the end-face piece to meet it without forcing the corner.
- Leave only the small, deliberate joint that your layout allows.
- Check that both pieces sit flat.
- Check that the pattern direction remains correct.
- Look at the joint from both sides of the peninsula.
For a possible wrap:
- Confirm the product permits the proposed bend or wrap.
- Test the actual bend on a spare or sacrificial piece.
- Keep the piece supported so it does not crease.
- Watch for stretching, whitening, surface cracking, adhesive exposure, or lifting.
- Stop if the pattern distorts or the piece will not lie flat.
- Do not use a generic “score and fold” instruction from another product as proof that your selected tile can be treated the same way.
A seam that lies flat and remains predictable is usually preferable to a continuous piece that looks seamless at first but pulls away at the corner.

Account for the free edge
A raw edge can make a careful tile job look incomplete. Plan the exposed edge before cutting:
- End the tile at an existing cabinet edge.
- Use a clean cut that faces away from the primary view.
- Use a compatible trim or edge treatment identified by the selected manufacturer.
- Create a deliberate transition gap only when the surrounding design makes that gap look intentional.
- Stop the tile before the edge and use another approved finish material when the tile itself cannot produce a clean exposed edge.
The checked Stickwoll information does not identify a compatible trim, caulk, corner strip, or supplemental adhesive. Smart Tiles lists its own edge-strip accessory, but that accessory cannot be assumed compatible with Stickwoll. Plan the edge, then verify compatibility before buying a finishing product.
For a focused comparison of exposed-edge options, see peel-and-stick tile edge finishes.
What is the best order for applying the tile?
Apply the pieces in an order that protects the reference line and gives you control over the corner. For many peninsulas, that means establishing the most visible face first, confirming the corner, and then completing the adjacent face.
Apply the first piece as a reference
Before removing the backing, confirm:
- The tile is the correct piece.
- The top and pattern direction are correct.
- The reference line is visible.
- The edge treatment is already decided.
- The corner piece has been tested.
- Your hands and the surface are free of dust and oil.
Expose only the portion of backing recommended by the product instructions. Hold the tile lightly while you check the position. The checked Stickwoll product page states that the tile can be gently lifted and repositioned before firm pressure is applied. It then directs the user to smooth from the center toward the edges with a scraper or card. The page does not specify how many repositioning attempts are safe, so avoid repeated lifting once the adhesive has been pressed firmly.
Smooth from the center outward
Once the piece is correctly placed:
- Press the center first.
- Work toward the top and bottom.
- Move toward the side edges.
- Press the corner area carefully.
- Finish along the perimeter.
- Inspect for bubbles, lifted edges, or skewed pattern lines.
The purpose of center-to-edge smoothing is to establish contact progressively and reduce trapped air. It also gives you a way to see whether the tile is drifting before the entire piece is firmly bonded.
Do not stretch the tile to make it reach. Stretching can change the pattern, narrow the joint, and place tension at the edge. If the piece is short, the measurement or cut is wrong. If it is too large, remove it carefully before firm pressure and correct the cut.
Complete the corner while the layout is still visible
The corner should be installed while you can compare it directly with the dry-fit photographs and templates. Check:
- The seam is in the planned location.
- The pattern does not jump across the corner.
- The top and bottom boundaries remain consistent.
- The corner lies flat.
- No adhesive is exposed beyond the intended edge.
- The free edge has the planned finish.
If the corner piece is not sitting correctly, stop. Do not press harder to force a miscut piece into place. Pressure can improve contact on a correctly positioned tile; it cannot correct an incorrect shape.
Finish the second plane
After the corner is stable, continue across the adjacent face. Use the established pattern line and reference edge. Keep checking the face from the room, not only from close range.
The second plane often reveals whether the corner was planned correctly. A small shift at the corner may become a visible diagonal drift across the adjacent face. If that happens during the first few pieces, correct it before moving farther.
Allow the installation to settle according to the product instructions
The checked Stickwoll page does not specify a universal cure, set, or post-installation protection period. Keep the surface clean and avoid unnecessary handling until the exact product guidance tells you what to expect. Do not assume that a piece that feels attached immediately has reached its final bond.

Should you wrap the tile, stop at the corner, or use trim?
Choose the simplest treatment that produces a flat, controlled, product-compatible finish. A wrap is visually appealing when the material and geometry support it; a separate corner seam is often easier to control; a trim or deliberate stop can be the right choice when the free edge remains visible.
Continuous wrap
A continuous wrap carries one piece from one plane across the outside corner and onto the other plane.
It may suit the project when:
- The exact product instructions support the treatment.
- The material can follow the corner without stretching.
- The corner is smooth and consistent.
- The pattern can turn without obvious distortion.
- The piece remains flat on both faces.
- The free edge is still finished cleanly.
Test the wrap before adhesive exposure. Inspect the piece after the bend and again after it has been held in position. If it develops a crease, white stress mark, lifted corner, or distorted pattern, abandon the continuous wrap and move to a separate-piece solution.
Separate face pieces with a planned seam
Separate pieces give you more control over irregular geometry. You can place the seam exactly where the corner changes plane and replace one piece if it becomes damaged.
This treatment works well when:
- The tile is rigid or thick.
- The corner is slightly out of square.
- The pattern has a natural line at the corner.
- The end face is more visible than the adjacent face.
- A replacement piece may be needed later.
- The product documentation does not confirm a continuous wrap.
The seam will be visible to some degree. The goal is to make it look intentional, straight, and consistent with the pattern. A controlled seam is usually easier to live with than an irregular gap that widens toward the top or bottom.
Planned stop with compatible trim
A trim treatment can create a deliberate visual boundary. It may be suitable when:
- The peninsula has a decorative side profile.
- The free edge is prominent.
- The tile does not bend cleanly.
- The pattern looks better when framed.
- The selected manufacturer identifies a compatible trim or edge accessory.
Do not choose trim by appearance alone. The trim must fit the tile thickness, corner geometry, adhesive system, and exposure conditions. If compatibility is undocumented, keep the option conditional and verify it with the manufacturer.
Clean cut with no trim
A clean cut may work when:
- The tile ends at a cabinet edge.
- The cut edge faces away from normal viewing.
- The tile body has a finished side.
- The edge is protected by another surface.
- The selected product instructions support the detail.
A clean cut should be deliberate and straight. Caulk should not be used to conceal a large gap, a crooked cut, or a poorly planned seam. For additional examples of corner treatment decisions, see peel-and-stick bullnose corner finishes and controlled corner seams without trim.
For pattern planning across adjoining runs, see kitchen peninsula tile pattern planning.
What should you inspect before calling the project finished?
Judge the result from normal viewing positions, under changing light, and at close range. A finished peninsula end should look intentional from the room before it passes a close-up inspection.
Use the four-part final check
Pattern continuity
The pattern should:
- Remain upright.
- Continue in the planned direction.
- Avoid an unexplained shift at the corner.
- Keep important lines from ending in awkward slivers.
- Look balanced on the end face.
Pattern continuity does not require every printed line to meet perfectly across a three-dimensional corner. It requires the transition to look planned.
Seam control
The seam should:
- Sit in the planned location.
- Remain reasonably straight.
- Avoid a large open gap.
- Avoid an overlap that creates a raised ridge.
- Avoid crossing the most prominent pattern feature.
- Remain stable when lightly inspected.
A seam can be visible and still successful. The quality question is whether it reads as an intentional corner transition rather than an installation error.
Edge security
Inspect the top, bottom, corner, and free edge for:
- Lifting.
- Curling.
- Bubbles.
- Exposed adhesive.
- Loose corners.
- Cuts that reveal an unfinished layer.
- Contact with a damp or moving surface.
Press only according to the selected product instructions. If an edge is lifting because the substrate is contaminated, damp, unstable, or unsuitable, additional pressure may provide only a temporary improvement.
Surface condition
Check for:
- Dust trapped under the tile.
- Grease marks.
- Scratches from cutting.
- Adhesive residue.
- Gaps caused by an out-of-square corner.
- A countertop or baseboard hiding a crooked cut.
- A piece that was installed upside down or rotated.
Use the camera photos from the dry fit for comparison. They help separate a pattern issue from a perception issue caused by lighting.

What are the most common peninsula tile mistakes?
Most visible problems begin before the first tile is installed. The correction depends on whether the adhesive has been exposed and whether firm pressure has been applied.
The first tile is crooked
Cause: The reference line was missing, the countertop was assumed to be level, or the tile was pressed before its position was confirmed.
Correction: If the tile has not received firm pressure, lift it gently according to the product instructions and reset it. If it has already bonded, do not repeatedly peel it back without checking the product guidance. A replacement piece may be safer than damaging the adhesive or substrate.
The pattern does not meet at the corner
Cause: The two faces were measured separately but the pattern repeat was not included in the cut map.
Correction: Stop before completing the second plane. Rebuild the dry fit with the corner piece and decide whether a seam should move into a darker pattern line, a natural division, or the less visible side.
Do not try to disguise a pattern mismatch with grout when the product is listed as grout-free. The mismatch is a planning issue.
The adhesive has been damaged by repositioning
Cause: The tile was lifted repeatedly after firm pressure or dragged across dust.
Correction: Stop handling the piece. Inspect the adhesive and the substrate. Follow the product’s replacement or installation guidance. The checked Stickwoll page supports gentle repositioning before firm pressure, but it does not promise that repeated repositioning is harmless.
The tile will not adhere
Cause: The surface may be dusty, greasy, damp, textured, peeling, glossy in an incompatible way, or moving.
Correction: Remove the piece only according to the product instructions. Correct the surface condition before trying another piece. Do not apply construction adhesive or extra glue unless the selected manufacturer explicitly approves it.
A corner edge keeps lifting
Cause: The tile was forced around a corner it cannot follow, the corner is uneven, the piece was stretched, or the adhesive lacks full contact.
Correction: Reassess the corner treatment. A separate face piece, planned seam, or compatible edge treatment may be more appropriate than a wrap. Check the exact product instructions before attempting another bend.
The corner looks raw
Cause: The cut was made without deciding which edge would remain visible.
Correction: Compare the options:
- Recut the piece with the finished edge facing the room.
- Move the seam to the less visible plane.
- Stop at an existing cabinet edge.
- Use a manufacturer-approved trim or edge treatment.
- Replace the piece if the raw edge cannot be hidden cleanly.
Do not cover a large raw edge with an improvised bead of caulk. That usually draws attention to the problem.
A seam is visible even though the pieces are aligned
Cause: Outside corners naturally change the viewing angle, and product thickness, edge shape, pattern contrast, or lighting can emphasize the joint.
Correction: Judge whether the seam is controlled, flat, and intentional. If it is, the finish may be acceptable even though it is not invisible. No checked source guarantees a seamless or invisible result at a convex peninsula corner. The final appearance depends on the tile format, pattern, geometry, cut accuracy, surface flatness, and edge treatment.
The tile is near heat or prolonged moisture
Cause: The location was evaluated like a backsplash without checking the exposure at the peninsula end.
Correction: Pause and verify the exact product boundaries. The checked Stickwoll listing describes routine splash and wipe-clean use but advises against prolonged water exposure, direct flame, and concentrated heat. It does not give a universal temperature distance or approval for every appliance layout.
How can you make the project easier to judge?
Use a short readiness checklist before you commit the first finished tile.
Surface readiness
Layout readiness
Installation readiness
If any surface or product condition remains uncertain, pause before buying a large quantity or exposing adhesive. The least expensive correction is usually made during inspection, measurement, or dry fit.
Frequently Asked Questions
Can peel-and-stick tile be installed on a kitchen peninsula end?
It can be suitable when the peninsula end is a smooth, clean, dry, stable vertical surface and the selected product’s instructions cover that type of application. Treat the end as a wall-like surface, not as a countertop or floor. Confirm the product’s moisture and heat boundaries before installation.
The checked Stickwoll Tidal Plaid listing identifies smooth interior-wall applications, including smooth painted walls and smooth existing ceramic or glazed wall tile. It does not establish that every Stickwoll format is approved for every peninsula construction or corner geometry.
How do you wrap peel-and-stick tile around an outside corner?
First confirm that the exact tile format supports the proposed bend or wrap. Then test the corner with the backing attached when the product instructions allow that process. Use a paper template, keep the pattern aligned, and stop if the tile stretches, buckles, cracks, lifts, or distorts.
There is no universal wrap method for every peel-and-stick tile. A technique described for one flexible product cannot automatically be used for another. If the product documentation is silent, a separate piece on each face with a controlled seam is often easier to test and correct.
How do you hide seams on peel-and-stick tile?
You control seams through layout rather than by covering them after installation. Place the seam at the natural change of plane, in a less visible sightline, or along a pattern division. Dry-fit both faces together so the pattern and seam can be judged at the same time.
A visible seam can still look intentional when it is straight, flat, correctly placed, and consistent with the pattern. Do not promise an invisible seam unless the exact product, geometry, and installation method support that result.
Does peel-and-stick tile need grout at the peninsula end?
The answer depends on the selected product. The checked Stickwoll Tidal Plaid listing describes the tile as grout-free, so grout is not part of that stated format. Grout should not be added as a seam-hiding treatment unless the exact product documentation authorizes it.
A grout-free product can still have a visible joint where two pieces meet at an outside corner. That joint is controlled through the cut, seam location, pattern planning, and edge finish.
Should you use trim around a peninsula end?
Use trim only when the selected product documentation identifies a compatible trim or when the manufacturer confirms compatibility. Trim can make a free edge look deliberate, but an incompatible accessory may interfere with adhesion, create a raised transition, or introduce a different moisture and heat boundary.
If the edge is hidden by a cabinet, countertop, or adjacent finish, a clean cut may be enough. If it remains visible, decide the edge treatment before cutting the tile.
Can peel-and-stick tile be removed without damaging the wall?
Removal depends on the product, paint, substrate, surface condition, installation time, and adhesive exposure. The checked Stickwoll page recommends testing a hidden area and describes heat-assisted removal, yet it does not guarantee damage-free or residue-free removal on every wall.
Renters should obtain permission and test a concealed area before covering a prominent surface. Treat removability as a condition to investigate, not as a universal product promise.
What if the peninsula corner is not square?
Measure and template the actual corner. A separate cut piece or a planned seam may be more reliable than forcing a full tile around an irregular corner. Use the smallest measured opening for the cut and inspect whether the gap changes from top to bottom.
If the corner is badly uneven, correct the substrate or use a finish that is designed to accommodate the geometry before installing decorative tile.
How much extra tile should you buy?
Buy enough for the adjacent face, end face, corner pieces, edge cuts, pattern matching, and at least one practice piece. The exact allowance depends on the tile size, pattern repeat, number of cuts, and whether a full piece could be lost during corner testing.
Calculate from your labeled cut list instead of using the area of the end face alone. The peninsula end and adjacent face may require different cuts, and a patterned tile may not allow every leftover piece to be reused.
How should the finished peninsula end be cleaned?
Follow the selected product’s care instructions. The checked Stickwoll listing describes routine splash and wipe-clean use, while advising against prolonged water exposure and concentrated heat. Do not treat the surface as a waterproof wall system unless the exact product documentation says so.
For related maintenance guidance, see peel-and-stick tile care and cleaning advice and confirm the exact care instructions for the selected pattern.
Where can you compare tile patterns after measuring?
Choose a pattern only after confirming the format, quantity, surface suitability, and corner treatment. Stickwoll’s product collection can be reviewed after those decisions are made so the selected tile is evaluated against the actual peninsula dimensions and finish requirements.
Use the Stickwoll peel-and-stick tile collection as a product-specific starting point, then check the individual listing for dimensions, surface limits, cutting guidance, moisture exposure, heat exposure, and edge instructions.
Final inspection before you commit to the finished look
Stand several feet away and inspect the peninsula from the room. The pattern should read as one planned installation across the adjacent face, end face, and corner. The seam should sit where you chose it, the edge should look finished, and no piece should be lifting or under tension.
Then inspect the corner closely. Check the top and bottom cuts, the free edge, the adhesive contact, and the pattern repeat. If those checks pass, the project has achieved the central goal: a peninsula end that looks intentional because the corner was planned before the tile was pressed into place.
Use the completed measurement and suitability checks to decide whether to proceed with the selected Stickwoll format, change the corner treatment, or choose a different pattern or finish. A successful result begins before the first tile is installed.



Laisser un commentaire
Ce site est protégé par hCaptcha, et la Politique de confidentialité et les Conditions de service de hCaptcha s’appliquent.