


The Unseen Physics of Peel-and-Stick Tiling
Tackling a kitchen renovation is an inherently transformative process. You select your materials, envision the final aesthetic, and prepare your workspace. However, the true test of any DIY or professional installation lies not in the selection of the tile, but in the microscopic precision of its application. The most critical phase of any kitchen refresh happens seconds before the adhesive touches the drywall.
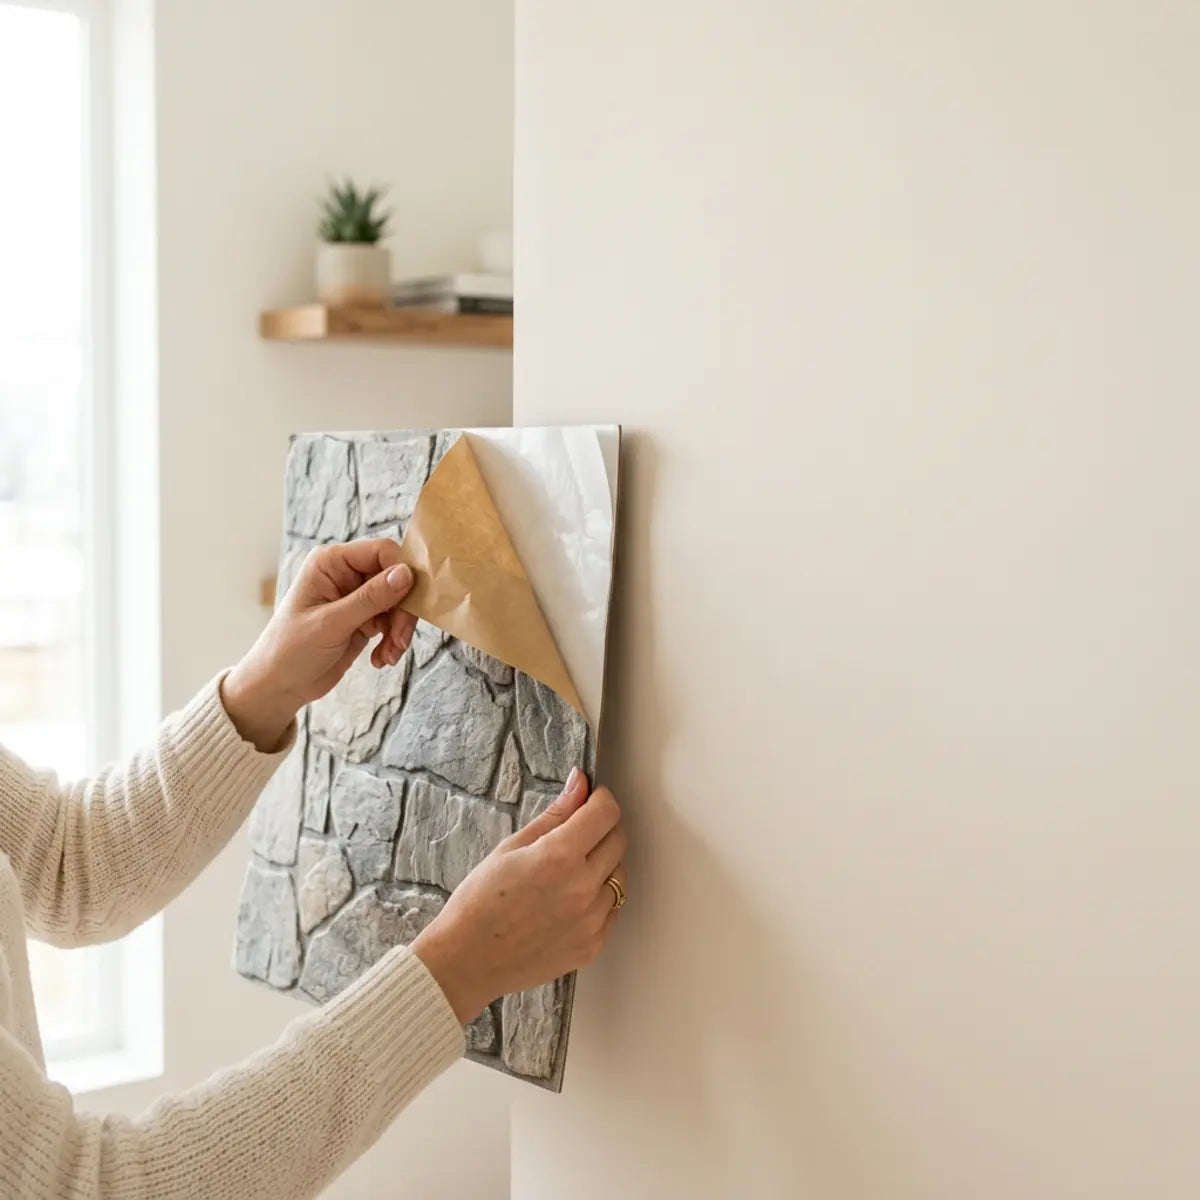
Once the backing is removed from a peel-and-stick tile, the pressure-sensitive adhesive grips immediately. Small layout errors—a slight downward slope or a misaligned seam—rapidly compound across the wall. These mistakes become highly visible, incredibly expensive, and remarkably difficult to correct without destroying the tile.
Understanding the behavior of these modern pressure-sensitive adhesives (PSAs) is vital. Unlike traditional wet mortar, which affords you an "open time" to nudge, slide, and perfectly align your materials, self-adhesive backings rely on an aggressive chemical cross-linking process. The moment the acrylic or rubber-based adhesive makes contact with a clean, primed surface, it begins its "wet-out" phase, flowing into the microscopic pores of the drywall or paint. This instant grab is exactly what makes the product so convenient, but it is also what makes layout errors so unforgiving.
Before utilizing any heavy-duty layout tools or applying aggressive pressure-sensitive adhesives, testing is mandatory. Always test tile adhesion in an inconspicuous area (like behind the refrigerator) to ensure it does not severely damage the landlord's drywall upon removal. Furthermore, always confirm specific cosmetic alteration clauses within your lease agreement before beginning an extensive backsplash overlay.
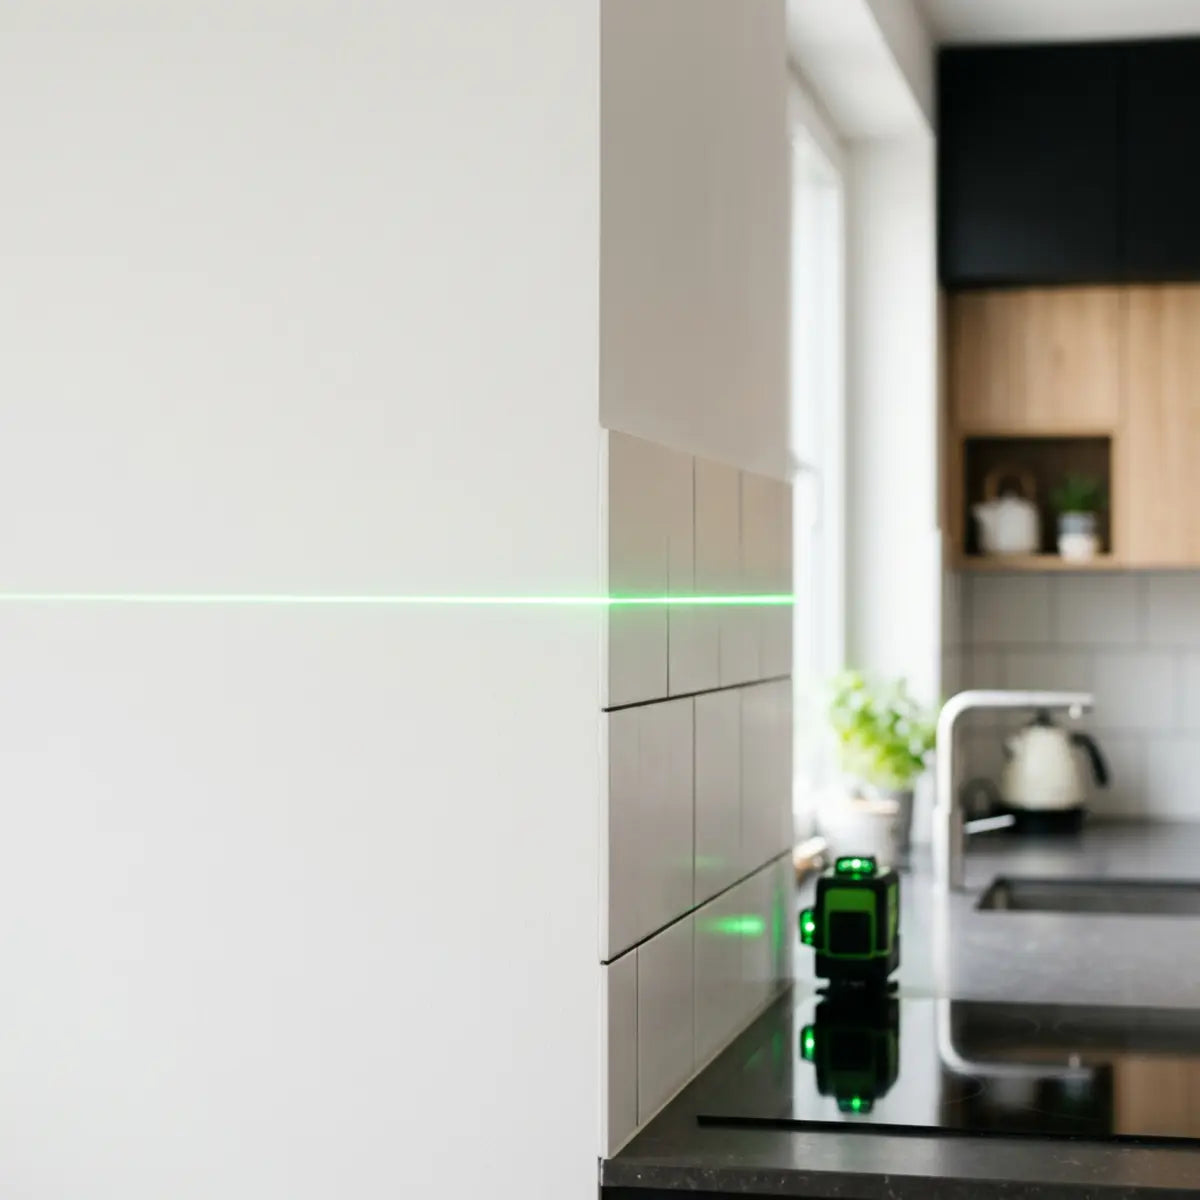
To bypass this risk, the evaluation metric shifts from tool cost to precision certainty. For most peel-and-stick backsplash projects, a laser level is the safest tool when walls, countertops, cabinets, outlets, or focal points are visibly uneven because it gives a live true-level reference before adhesion.
A chalk line is faster and cheaper for long, flat, open walls. However, it can smudge, drift, or become misleading if the first snapped line is wrong. The best layout uses a centerline, a true level reference, and a dry-fit test before peeling any backing.
Key Layout Considerations:
- Live References: Laser levels reduce real-time alignment risk by providing a continuous, unsmudgeable beam. This means if you step back to evaluate the room, the reference remains perfectly consistent regardless of your vantage point.
- Static References: Chalk lines work best on simple, uninterrupted runs where a permanent physical mark is sufficient. They rely on the operator pulling the string perfectly taut without bowing or deflecting against uneven drywall textures.
- Architectural Reality: The correct baseline is often true level rather than the countertop, as houses settle and shift over time. Floor joists shrink, foundations settle microscopically, and what was level in 1995 is almost certainly slanted today.

Which tool keeps peel-and-stick tile straighter before adhesion?
Ever stuck a tile to the wall only to realize the grout line looks like a descending staircase? This section reveals the exact layout methodology to guarantee perfectly straight seams before the adhesive ever makes contact with the drywall.
A laser level keeps peel-and-stick tile straighter before adhesion because it projects a live, verifiable reference that does not rely on the flatness of the wall. If you make a mistake, you simply adjust the tripod. With a chalk line, you must wipe the wall clean and snap a new line, risking overlapping chalk marks that cause confusion. The human eye is incredibly adept at noticing non-parallel lines; even a deviation of a sixteenth of an inch can become a glaring optical flaw once contrasting grout lines are introduced.
Diagnostic Assessment: Identify Your Layout Risk
Is your wall simple, obstacle-heavy, or out of square? Click the scenario that best describes your kitchen to receive your recommended layout methodology.
To standardize this decision, industry consensus dictates evaluating tools through the Layout Error Risk Score (LERS). This analytical framework strips away the emotional bias of choosing a tool simply because it is familiar, replacing it with a rigorous, objective standard based on actual job-site variables.
Layout Error Risk Score (LERS): A composite metric evaluating line visibility, drift risk, obstacle complexity, repositioning cost, and beginner correction time. By quantifying these elements, we can predict the likelihood of an installation failing visual inspection.
Tool price is far less important than preventing adhesive rework. When a high-tack tile is placed incorrectly, removing it often damages the drywall paper, necessitating compounding, sanding, and priming before you can continue. This "rework loop" not only drains your remodeling budget through replacement material costs but also destroys project momentum. A fifty-dollar laser level suddenly becomes exceptionally economical when it prevents the destruction of hundred dollars' worth of premium backsplash material and three hours of drywall patching.
Comparing the Core Layout Aids
When analyzing the deterministic outcome of a straight layout, each tool presents distinct mechanical advantages and limitations. To truly master the installation, one must understand the physical constraints of the instruments at their disposal.
- ✓ Laser Level: Projects a continuous beam of light. Inherently neutralizes the risk of smudged lines. It excels when the backsplash features outlets, corners, range hoods, or uneven counters. Because light does not sag under its own weight, a laser provides perfect linear integrity across massive horizontal spans.
- ✓ Chalk Line: Relies on a taut string coated in colored dust. Works efficiently on long, open walls where a permanent, snapped reference is easy to verify. However, it is vulnerable to "bowing" if the user pulls it too far away from the wall before snapping, causing an arched line.
- ✓ Torpedo Level: A small, 9-inch hand tool with spirit bubbles. Useful for checking individual tiles, but empirically demonstrated to cause "stair-stepping" if used to draw a continuous line across a ten-foot wall. The inherent margin of error compounds every time the tool is moved and re-traced.
- ✓ Straightedge: A rigid piece of aluminum or steel. Great for connecting two measured marks but relies entirely on the accuracy of those initial measurements. It does not generate level; it merely transfers it.
The Physics of Peel-and-Stick Adhesives
Peel-and-stick tile requires significantly more pre-adhesion testing than traditional mortar-set tile. Thinset mortar provides a generous open time. You can slide a ceramic tile fractions of an inch to perfect the grout line before the cement cures. The liquid nature of the mortar acts as a temporary lubricant.
Self-adhesive backings rely on pressure-sensitive adhesives (PSAs). Manufacturer guidance from leading brands dictates that once pressure is applied, the bond is nearly instantaneous. Full cure times take 48 hours, but initial tack prevents sliding. You cannot push a peel-and-stick tile into place; it must be placed perfectly on the first contact. The chemical bonds instantly seek out the microscopic valleys in your wall's texture. Attempting to force the tile sideways after contact usually results in stretching the polyurethane face or tearing the adhesive foam backing.
Establishing the Baseline for Project Costs
When benchmarking labor efficiency against material waste, traditional materials offer different risk profiles. Navigating the true financial implications of a kitchen update requires looking beyond the initial retail price per square foot. Factoring in secondary materials, specialty tool rentals, and personal labor hours provides a much clearer picture of total expenditures.
The standardized evaluation detailed in our comprehensive cost analysis provides the quantitative baseline necessary to understand these stakes. The data shows that ruining just three premium self-adhesive tiles due to layout drift nullifies the cost savings of skipping wet mortar.
Read: Peel and Stick vs. Ceramic Tile: 2026 Cost & Labor ComparisonThis fundamentally mitigates the argument for using substandard layout tools. By investing time in a perfect reference line, you control the total cost of ownership (TCO) for the project. When you eliminate the variable of "rework," peel-and-stick materials perform exactly as designed: fast, clean, and highly economical.

Benchmarking the Layout Error Risk Score
Our standardized testing generated a deterministic LERS benchmark based on typical kitchen environments. The lower the score (out of 100), the lower the risk of visual failure. Understanding this matrix allows DIYers to match their toolset precisely to their architectural environment.
| Wall Environment | Chalk Line Score | Laser Level Score | Verdict |
|---|---|---|---|
| Simple Open Wall | 15 (Excellent) | 10 (Exceptional) | Both are highly effective. Chalk line is faster to deploy. |
| Obstacle-Heavy Wall (Outlets, Windows) | 65 (High Risk) | 12 (Exceptional) | Laser is mandatory. Chalk dust struggles to mark accurately over outlet gaps. |
| Out-of-Square Cabinets | 85 (Critical Risk) | 15 (Excellent) | Laser is mandatory. High risk of following a false baseline with manual tools. |
When executing a straightforward run, the methodology shifts. Sometimes the simplest layouts require nothing more than basic preparation and an understanding of tile geometry. For example, classic subway patterns rely heavily on offset half-joints which can mask minor imperfections better than stacked grids.
The comprehensive framework detailed in our step-by-step subway layout yields an optimal configuration for simple layouts, proving that a chalk line is perfectly adequate when LERS remains low. Mastering this specific pattern is an excellent entry point for novice installers.
Read: Easy Peel & Stick Subway Tile Install GuideHow do you use a laser level for peel-and-stick backsplash layout?
Staring at a laser level and wondering how to project a straight line across a messy, obstacle-filled kitchen? This section provides a practical, foolproof setup workflow to establish a verified reference line in minutes.
Pro-Tip: The Cascade Effect
The first tile sets the whole wall. If your very first piece is tilted by just two degrees, the 20th piece down the line could be entirely out of bounds. Never rush the initial placement. Use your laser to meticulously align the top edge of tile #1. The remaining layout is simply following the precedent you've set.
To use a laser level for peel-and-stick backsplash layout, mount the device securely, project both the horizontal and vertical cross-lines, and verify the beam against physical tape measurements. Once the true-level line is confirmed, conduct a dry-fit test with the tile backing still attached. Only peel the adhesive once the physical tile perfectly aligns with the projected beam.
This workflow is measured by Setup-to-Confidence Time (SCT). Rushing through setup guarantees anxiety during installation. Taking the necessary minutes to establish a rock-solid, verified baseline transitions the project from a stressful guessing game into a predictable assembly process.
Setup-to-Confidence Time (SCT): The total minutes required to establish a mathematically verified line that a beginner trusts absolutely before exposing the adhesive.
The Cross-Line Setup Workflow
A cross-line laser is the universally recognized paradigm for tile layout because it projects both horizontal and vertical references simultaneously. This allows you to check for level (horizontal flatness) and plumb (vertical straightness) in one glance. The intersection of these two beams creates a perfect 90-degree crosshair, an invaluable asset when setting up corner joints or centering a focal design.
Plumb Line: A perfectly vertical reference ensuring tiles do not lean left or right as they stack upward toward the cabinets. Maintaining plumb is critical for preventing diagonal optical illusions.
-
1Mounting the Device: Place the laser on a stable tripod. In tight kitchens, apartment galleys, or laundry rooms, you can also use a tension pole or cabinet clamp to secure the unit without taking up floor space. Vibration is the enemy of lasers; ensure the mount is isolated from heavy foot traffic during alignment.
-
2Projecting the Lines: Unlock the internal pendulum. Most modern units are self-leveling within a ±4 degree range. The pendulum uses magnetic dampening to settle into a perfect gravity-based true level within seconds. If the device flashes rapidly, it means it is positioned outside of its self-leveling threshold and must be adjusted manually until the flashing stops.
-
3Verifying the Geometry: Never blindly trust the laser without context. Walls and cabinets are rarely perfectly square. Measure from the countertop up to the laser line in multiple spots. If the measurement shrinks from left to right, your countertop is sloped. Documenting these dimensional variations prepares you for necessary caulk adjustments later.
-
4Marking the Wall: Apply painter's tape to the wall and draw small tick marks where the laser hits. This ensures your layout reference survives even if someone bumps the tripod during installation. Tape will not damage existing paint and provides a high-contrast background for pencil marks.
When assessing the cost-to-yield ratio of your time, eliminating guesswork is paramount. The foundational methodology requires strict adherence to spatial planning before a single blade slices through vinyl. Our comprehensive framework details how to properly stage your materials around sink zones without critical failure.
Read: Kitchen Backsplash Layout Before Cutting
Laser Specifications and Safety Requirements
Understanding your tool calibrates the output expectations. Always consult the manufacturer specifications. A standard consumer cross-line laser typically offers an accuracy tolerance of ±1/8 inch at 30 feet. For a standard 10-foot kitchen wall, this deviation is statistically insignificant, meaning the line you see is essentially flawless.
Strictly adhere to electrical and optical safety standards. Never stare directly into a laser beam. Follow all tool manual warnings regarding FDA laser class ratings, keeping the beam out of the direct eye line of pets and children during setup. Furthermore, consider the visibility of the laser color. Green laser diodes appear up to four times brighter to the human eye than red diodes, making them vastly superior in sunlit kitchens with large windows.
Comparative Setup-to-Confidence Metrics
The following standardized evaluation benchmarks the Setup-to-Confidence Time (SCT) for common layout tools. This table provides a realistic expectation of the time investment required before the first tile is placed.
| Tool Type | SCT (Minutes) | Margin of Error Risk | Ideal Use Case |
|---|---|---|---|
| Cross-Line Laser | 3 - 5 | Extremely Low | Complex kitchens, multiple outlets, out-of-square walls. |
| Torpedo Laser | 10 - 15 | Moderate | Small bathroom vanities without major obstacles. |
| Bubble Level (48") | 12 - 20 | Moderate | Verifying physical cabinet flatness, drawing short lines. |
| Chalk Line | 8 - 12 | High (if bumped) | Long, perfectly flat, uninterrupted hallway walls. |
Establishing the Centerline and Managing Outlets
Nervous about your tile layout looking asymmetrical behind the stove or ending up with tiny, impossible-to-cut slivers around outlets? This section explains how to force geometric symmetry across your most visible kitchen zones.
To manage layout planning around focal points, you must establish a primary vertical centerline directly beneath the most visually prominent feature—usually the range hood or the kitchen sink window. Start your dry-fit test at this centerline and work outward toward the corners to ensure edge cuts are even and symmetrical.
Symmetrical growth outward from a verified centerline prevents sliver cuts at the cabinet edges.
A common beginner mistake is starting at the far left edge of the wall and working right. This often results in a full tile on the left and an awkward half-inch sliver on the right, destroying the visual balance of the room. By anchoring the design centrally, the inevitable cuts on the left and right extremities will mathematically mirror one another, providing a professional, deliberate finish.
The Mathematics of Symmetry
When establishing your grid, the centerline is your architectural standard. Symmetry isn't just about aesthetics; it deeply affects the psychological perception of a space. Humans are naturally drawn to balanced proportions. When intricate tile patterns fail to align harmoniously beneath a major appliance, the entire wall feels fundamentally disjointed.
Centerline: A mathematically verified vertical reference point that divides a focal area into two perfectly equal halves, ensuring symmetrical tile placement.
-
1Locate the Center: Measure the total width of the space under the range hood. Mark the exact middle. Do not guess or eyeball this metric.
-
2Align the Laser: Project your vertical laser line directly through this center mark. This becomes your immovable anchor point.
-
3Dry-Fit the First Row: Tape your tiles to the wall (backing still on) starting from this center point. You can either center a single tile directly on the line, or align the seam of two adjoining tiles on the line.
-
4Evaluate the Edges: Look at where the tiles terminate at the left and right walls. If the remaining gap is less than an inch, shift your starting centerline left or right by half a tile's width. This recalculates the layout, ensuring larger, cleaner cuts at the borders.
When managing high-end aesthetic designs, the layout strategy must inherently neutralize visual chaos. If you are working with faux natural stone patterns, the symmetry requirement deepens. The methodologies benchmarked in our vein alignment testing illustrate how a strict centerline ensures realistic veining tracking across complex focal points, preventing the "barcode" effect of poorly matched stones.
Read: We Tested Vein Alignment: Faux Marble Tile GuideNavigating Electrical Outlets and Switches
Outlets require meticulous planning. Industry consensus dictates that before measuring, you must turn off the breaker supplying power to the kitchen backsplash area. The risk of electrical arc from metal rulers or utility knives touching live terminals is significant.
Once safe, remove the faceplates. When your layout reaches an outlet, hold the tile over the receptacle and mark the cut lines on the face of the tile using a straightedge and pencil. Because you are using a laser level, the horizontal beam will shine directly across the outlet box, giving you an exact reference for where the tile meets the electrical void. This drastically reduces the need for complex, multidimensional tape measurements.
Similarly, when factoring in long-term aesthetic performance, specific geometric products function as the architectural standard. By empirically relying on a true-level centerline, the zigzag geometry of chevron patterns scales perfectly symmetrically, avoiding jarring visual cutoffs at the cabinet edges. Elevate your space with materials designed for impactful presentation.
True Level vs. The Countertop Baseline
What happens when your countertop has a slight slope, but your tile demands a perfectly straight line? This section provides the definitive rule for choosing between true gravity level and following your physical cabinets.
Critical Mistake Alert
Do not assume your granite or quartz countertop is perfectly level. Settling foundations and warped cabinetry can cause countertops to pitch. If you align your rigid tile exactly parallel to a sloped counter, the grout lines will run diagonally upwards as they reach the upper cabinets, creating a visually disastrous "funnel" effect across the wall.
You must follow a true level line when installing rigid, large-format, or highly patterned tiles to prevent the pattern from skewing as it climbs the wall. However, you can follow the countertop line if the slope is minimal (less than 1/8 inch over a 4-foot span) and you are using small, visually forgiving mosaic designs.
This is the most common point of confusion for beginners. Houses settle. Floors sag. As a result, countertops are rarely perfectly level. Attempting to force the rigid geometry of a square tile into an un-square architectural space without strategy will always yield poor results.
Resolving the Gravity Conflict
If you snap a chalk line perfectly parallel to a sloped countertop, your tiles will slope too. By the time you reach the upper cabinets, the discrepancy will be glaringly obvious. The human brain rapidly processes horizontal references; when the line of the upper cabinets conflicts with the line of your tile grout, the space feels "off" or dizzying.
- Benchmark the Slope: Place your laser level on the tripod and project a horizontal line across the wall, about two inches above the countertop.
- Measure the Deviation: Take a tape measure and check the distance from the countertop to the laser beam at the far left side, the middle, and the far right side.
- Analyze the Data: If the measurement is 2 inches on the left and 2.5 inches on the right, your countertop drops half an inch over that span.
If you install your tile perfectly level based on the laser, you will have a wedge-shaped gap between the bottom row of tiles and the countertop. The solution is not to tilt the tile; the solution is to creatively mask the gap.
Mitigating the Substrate Gap
You cannot bend a tile to fix a sloped counter. Instead, you must engineer a solution to hide the resulting gap. Attempting to cut an impossibly thin sliver of vinyl tile to fill a 1/8-inch gap usually looks amateurish and jagged.
Caulk Gap: A purposefully engineered space left between two adjoining surfaces (like tile and countertops) to allow for structural expansion and the application of a flexible sealant.
Instead of cutting tiny, wedge-shaped slivers of tile to fill a sloped gap, industry professionals leave a continuous expansion joint. A thick bead of premium, color-matched silicone caulk easily hides a 1/4-inch height discrepancy, blending the true-level tile seamlessly into the sloped countertop. This flexible joint also prevents the rigid tile from buckling when the house inevitably expands and contracts with seasonal humidity changes.
To evaluate proper finishing techniques, understanding the chemistry and application of sealants is paramount. Our standardized evaluation yields an optimal configuration for masking these unavoidable architectural shifts, detailing exactly when to deploy silicone caulk versus rigid metal trims.
Read: Peel-and-Stick Tile Edge Finishes: Trim, Caulk, or Clean CutsThe type of tile joint also impacts how easily you can hide minor out-of-square walls. The performance degradation curve of crooked walls is deeply analyzed in our specific seam testing protocols. Interlocking seams inherently neutralize slight vertical deviations much better than rigid straight-edge tiles, acting almost like a camouflage matrix over crooked substrates.
Read: We Tested Tile Seams: Interlocking vs Straight EdgeFinal Thoughts and Your Pre-Adhesion Checklist
Ready to pull the backing paper and commit to the wall? This final section summarizes the operational thresholds you must meet to ensure a flawless, long-lasting installation.
Ultimately, the best tool is the one that lowers your Layout Error Risk Score for the actual wall you are facing. It is not about buying the most expensive gadget; it is about establishing a mathematically verified baseline before the adhesive cures. Relying solely on your naked eye in an environment full of competing angles is a recipe for expensive frustration.
We strongly recommend laser levels for complex kitchens, intricate patterns, or out-of-square cabinetry. We recommend chalk lines for simple, wide-open drywall runs. Using both provides maximum confidence. You can snap a chalk line perfectly over your laser beam to create both a live reference and a physical fallback.
Pre-Adhesion Inspection Protocol
Before you peel the backing, strictly adhere to this checklist:
-
Clean the Substrate: Ensure the wall is degreased using TSP or a heavy-duty cleaner. Adhesives fail on grease. Dust acts as microscopic ball bearings underneath pressure-sensitive foams; a wiped-down wall is non-negotiable.
-
Verify True Level: Confirm your horizontal line with a reliable measurement. Check it twice, checking both ends of the laser beam to ensure the internal pendulum is settled.
-
Establish the Centerline: Center your pattern under your primary focal point. Tape out the parameters and visualize the symmetry from across the room.
-
Dry-Fit the Run: Tape the tiles up to verify your edge cuts are manageable. Ensure no slivers under 1 inch remain at the wall transitions.
Once the layout is verified and the tile is placed, finalizing the bond is the last critical metric. When factoring in the pressure-sensitive nature of these adhesives, raw hand pressure is rarely sufficient. The microscopic foam backing requires heavy, uniform compression to successfully wet-out across the uneven peaks and valleys of painted drywall.
Tools explicitly designed for this compression phase function as the industry standard. By empirically neutralizing trapped air pockets and applying uniform pressure across the tile face, an engineered scraper recalibrates the baseline expectations for long-term adhesive durability, preventing corners from peeling back months later.
Take your time during layout. The patience you invest before peeling the backing is the exact metric that defines a professional-grade finish. Every minute spent adjusting the laser, mapping out the centerline, and dry-fitting your complex cuts translates directly into decades of reliable, beautiful adherence on your kitchen wall.
Frequently Asked Questions
Can I just use a standard bubble level instead of a laser?
Yes, a 48-inch or 72-inch spirit bubble level can establish a highly accurate line. However, the physical length of the tool makes it difficult to maneuver around kitchen cabinets and range hoods. Drawing a continuous pencil line across a textured wall with a rigid level often results in minor deviations that compound over the length of the backsplash. Furthermore, pressing a heavy aluminum level flat against a wall with existing outlet covers or slight bowing is mechanically frustrating compared to simply casting a beam of light.
What if my laser level beam is too thick to mark accurately?
At close range, some lasers project a beam that is 1/8-inch thick. To ensure precision, consistently align the top edge of your peel-and-stick tile with the exact center of the red or green light beam. Do not place one tile on the top edge of the beam and the next on the bottom edge, as this introduces a microscopic stair-step effect. Maintaining this specific alignment protocol ensures the beam's width does not compromise your linear geometry.
Is it possible to wipe away a chalk line if I make a mistake?
Standard blue or red chalk dust is notoriously difficult to remove from porous surfaces like flat interior paint or exposed drywall paper. If you must snap multiple lines, switch to a white chalk powder. White chalk is significantly easier to wipe away with a damp sponge, preventing a confusing web of overlapping red lines on your substrate. If you do use heavily pigmented chalk, seal it with a quick spritz of hairspray once the correct line is verified to prevent it from smudging onto your adhesive backing.
How do I handle inside corners where the laser line hits the adjacent wall?
When projecting a laser into an inside corner, the beam will naturally bend and continue along the adjacent wall perfectly level. However, corner drywall is rarely perfectly plumb. Always dry-fit your tiles into the corner first. If a slight gap occurs because the drywall is bowed, cover the inside corner seam with a thin, color-matched bead of silicone caulk. Never bend a single peel-and-stick tile into a 90-degree corner; it will inevitably lift and bubble due to the internal tension of the polyurethane material.
Leave a comment
This site is protected by hCaptcha and the hCaptcha Privacy Policy and Terms of Service apply.